Sunday, 24 February 2013

AJAX Navigation Menu For Blogger


Earlier this month, I posted an article on AJAX page loading effect for Blogger, which was so far the best AJAX trick for a Blogger blog.

AJAX is not a new programming language, but a new way to use existing standards. AJAX is the art of exchanging data with a server, and updating parts of a web page - without reloading the whole page. AJAX was made popular in 2005 by Google, with Google Suggest.

So, today I'am sharing a very nice Mashable style AJAX drop down menu for Blogger, which is created by W2B. The menu is works just like normal drop-down menu when javascript is disabled, And it will turns to AJAX powered drop-down menu when javascript is enabled.

Add This Menu To Blogger:

  • Go To Blogger > Template > Edit HTML > Click on "Proceed."
  • Search for ]]></b:skin> and post following css just above it:

/* Menu Stylings */
.w2bmenu *{margin: 0;padding: 0;}
ul.w2bmenu {list-style: none;line-height: 1;overflow: visible !important;}
ul.w2bmenu:after{margin: 0;padding: 0;content: ' ';display: block;height: 0px;clear: both;}
ul.w2bmenu li{list-style: none;position:relative;float: left;margin: 0 !important;padding: 0 !important;}
ul.w2bmenu li a{text-decoration:none;margin: 0;padding: 12px 16px !important;font-family: 'Helvetica Neue', Arial, Helvetica, sans-serif !important;color: #6b6b6b !important;text-shadow: 0 1px 0 #fff;font-weight: 700 !important;text-transform: uppercase !important;font-size: 12px !important;display: block !important;border: 0 none !important;}
ul.w2bmenu li a:hover,ul.w2bmenu li a.hoverover{background: #f5f5f5 !important;}
ul.w2bmenu ul{position: absolute;display: none;top: 100%;border:1px solid #ccc;}
ul.w2bmenu li:hover > ul{display: block;}
ul.w2bmenu ul li{float: none;min-width: 160px;background:#f5f5f5;text-shadow: none;}
ul.w2bmenu ul li a{padding: 12px 14px;text-transform: none;font-weight: normal;}
ul.w2bmenu ul li a:hover,ul.w2bajaxmenu ul li a.hoverover{background: #fff !important;}
ul.w2bmenu ul ul{display: none;left: 100%;top: 0;}
/* AJAX Menu Stylings */
ul.w2bajaxmenu li div.submenu {display: none;position: absolute;width: 600px;z-index: 90;left: -1px;top: 100%;overflow: hidden;min-height: 150px;background: #fff;border:1px solid #cccccc;border-top: 0 none;}
ul.w2bajaxmenu li:hover div.submenu {display: block;}
ul.w2bajaxmenu ul ,ul.w2bajaxmenu ul li{display: block !important;border: 0 none !important;margin: 0 !important;padding:0 !important;}
ul.w2bajaxmenu ul li{background: none !important;float: none !important;}
ul.w2bajaxmenu ul.verticlemenu{position: absolute;width: 33%;left:0;top:0;bottom: 0;background: #f5f5f5;}
ul.w2bajaxmenu ul.postslist {position: relative;display: block;width:65%;float: right;margin: 8px 0 !important;background: none;}
ul.w2bajaxmenu ul.postslist li{display: block;overflow: hidden;border-bottom: 1px #eee solid;position: relative;min-height: 60px;padding: 8px 8px 8px 110px !important;}
ul.w2bajaxmenu ul.postslist li:last-child{border-bottom: none 0;}
ul.w2bajaxmenu ul.postslist li .imgCont{position: absolute;left: 0;top:8px;width: 100px;height: 60px;overflow: hidden;border:1px solid #dcdcdc;font-size: 0;line-height: 0;}
ul.w2bajaxmenu ul.postslist li .imgCont img{position: relative;top:-20px;padding: 0;width: 100px;height: 100px;display: block;}
ul.w2bajaxmenu ul.postslist li a{display: block;line-height: 1.4;padding: 0 !important;}
ul.w2bajaxmenu .loader{background:url('https://blogger.googleusercontent.com/img/b/R29vZ2xl/AVvXsEgcAwncprkWmz_NVH6_V7vSerIPXdFxbOvmi9NznbaqL-YseeM-LMIo-irZIMdJ8Fj5LYB2v0GbORQxfIEjgHNpcTuyQ2Q1QgLD7jJcqELgqvEF43K1tVmYoBKST7ZRNpZ3m_xUIGAglAE/s1600/SeivG.gif') no-repeat scroll 0 0 transparent;width:22px;height:22px;position: absolute;top:50%;margin-top: -11px;right:5px;}
ul.w2bajaxmenu .menuArrow {border-bottom: 4px solid transparent;border-top: 4px solid transparent;border-left: 4px solid #999999;display: block;height: 0;margin-top: -4px;position: absolute;right: 11px;top: 50%;width: 0;}
#w2bajaxmenu {background: #ededed;background: -moz-linear-gradient(top, #ededed 0%, #e0e0e0 100%);background: -webkit-gradient(linear, left top, left bottom, color-stop(0%,#ededed), color-stop(100%,#e0e0e0));background: -webkit-linear-gradient(top, #ededed 0%,#e0e0e0 100%);background: -o-linear-gradient(top, #ededed 0%,#e0e0e0 100%);background: -ms-linear-gradient(top, #ededed 0%,#e0e0e0 100%);background: linear-gradient(to bottom, #ededed 0%,#e0e0e0 100%);filter: progid:DXImageTransform.Microsoft.gradient( startColorstr='#ededed', endColorstr='#e0e0e0',GradientType=0 );border: 1px solid #cccccc;}

  • Now search for </head> and paste following script just above it:

<script type="text/javascript" src="http://widcraft.googlecode.com/svn/jquery.min.js"></script>

<script type="text/javascript" src="http://widcraft.googlecode.com/svn/AJAXBloggerMenu.min.js"></script>
<script type="text/javascript">
jQuery(document).ready(function($) {
    $('#w2bajaxmenu').ajaxBloggerMenu({
        numPosts : 4, // Number of Posts to show
        defaultImg : 'https://blogger.googleusercontent.com/img/b/R29vZ2xl/AVvXsEgRFeTajLrpW3Ob3OROSkVTJHcqjYWgEQYiB7xij6-xhs-MlLu4luvA8RGzk2ZUHD_jhY0AaCJ5oPUTCHy4fj7rUwE2Y3yIyczyOFnNJwfdOEDTloXopSafrvBATwoIgLl6cLhTOi0iMN8/s1600/bigthumbnail.png' // Default thumbnail Image
    });
});
</script>

  • Save your template....Time for the final and most complicated step, so pay some attention to this.

The AJAX Menu accepts three types of urls. You must use this urls only in the menu. They are Label, Search Query and Label w/ Search Query.

  • Label URL: http://yourblogdomain.blogspot.com/search/label/LABELNAME
  • Search Query: http://yourblogdomain.blogspot.com/search?q=SEARCHQUERY
  • Label w/ Search Query: http://yourblogdomain.blogspot.com/search/label/LABELNAME?q=SEARCHQUERY

  • Go To Blogger > Layout > Add A Gadget > HTML/JavaScript
  • Post following code:

<ul id="w2bajaxmenu" class="w2bmenu">
    <li>
        <a href="#">Home</a>
    </li>
    <li>
        <a href="#">Example 1</a>
        <ul>
            <li><a href="http://yourblogdomain.blogspot.com/search/label/AdSense">Sample Label</a></li>
            <li><a href="http://yourblogdomain.blogspot.com/search/label/Gadgets?q=harish">Label w/ Search</a></li>
            <li><a href="http://yourblogdomain.blogspot.com/search?q=way2blogging">Search Query</a></li>
            <li><a href="http://yourblogdomain.blogspot.com/search?q=This+is+long+query+you+do+not+get+any+results,+so+try+others">Unknown Search</a></li>
        </ul>
    </li>
    <li>
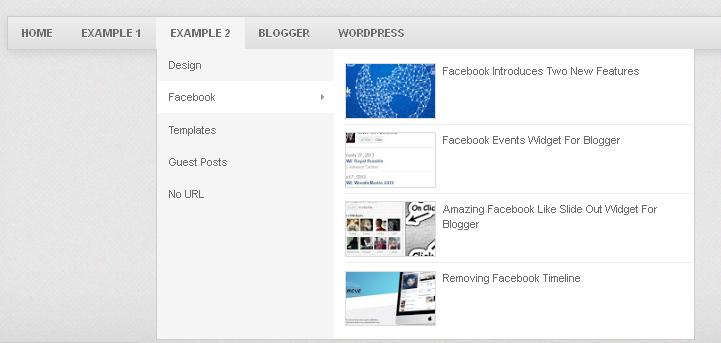
        <a href="#">Example 2</a>
        <ul>
            <li><a href="http://yourblogdomain.blogspot.com/search/label/Design">Design</a></li>
            <li><a href="http://yourblogdomain.blogspot.com/search/label/Facebook?q=Like+Button">Facebook</a></li>
            <li><a href="http://yourblogdomain.blogspot.com/search/label/Templates">Templates</a></li>
            <li><a href="http://yourblogdomain.blogspot.com/search?q=Guest+Posts">Guest Posts</a></li>
        </ul>
    </li>
    <li><a href="http://yourblogdomain.blogspot.com">Normal Link</a></li>
</ul>

That's IT....Also, don't forget to change your blog's url in above code....

Friday, 22 February 2013

Twitter Cards For Blogger


Twitter Cards show more detail about your posts to give readers a little preview of what they'll see when they click your link. And, the cards work when anyone Tweets a link to your post.

Adding META tags to your blog to allow links to your site to be more informational when tweeted.  Implementing Twitter Card META tags on your site takes five minutes.

In this tutorial I'm going to focus on making a summary card. The other two card types — photo and player — are not included in this tutorial, but you can learn more about them from the official Twitter Cards documentation.

Twitter Card META Tags:

Before starting this tutorial, I wanna discuss about Twitter Card META tags. You can easily setup your blog's Twitter Card by adding several META tags to your blog. As I mentioned above, in this tutorial I'am only going to focus on summary card, which is most important for your blog.

META tags you would use in all card cases include:

  • twitter:card - The type of card to be created: summary, photo, or video.
  • twitter:url - The URL that should be used for the card.  This will likely be the same URL as the page's canonical link.
  • twitter:title - The title as it should display in the Twitter Card.
  • twitter:description -  A 200 character summary of the content at the given URL.
  • twitter:image - A representative image URL for the content.  In many cases, simply providing your logo's URL will be just fine.
  • twitter:site - The Twitter username used by the given site including the '@'
    twitter:creator - The Twitter username of the individual author of the content

Get Your Blog Posts Ready for Twitter Cards:

Twitter Cards use your post's Search Description as your summary, so you'll want to make sure that you've filled it in on each post.

Adding Twitter Card META Tags To Blogger:

Now, I'll show you how to perfectly add these META tags to your blog's template. Don't forget to backup your template.

  • Go To Blogger > Template > Edit HTML > Click on "Proceed"
  • Once you've opened up your template, find the </head> tag in your template's markup. Enter this markup directly above the </head> tag:

<!-- twitter card details -->
<meta content='summary' name='twitter:card'/>
<meta content='@HardeepAsrani' name='twitter:site'/>
<meta content='@HardeepAsrani' name='twitter:creator'>
<meta expr:content='data:blog.url' name='twitter:url'/>
<meta expr:content='data:blog.pageName' name='twitter:title'/>
<meta expr:content='data:blog.metaDescription' name='twitter:description'/>
<meta expr:content='data:blog.postImageThumbnailUrl' name='twitter:image'/>
<!-- end twitter card details -->

  • In above code, replace HardeepAsrani with your Twitter handler. Now save your template.

Test Your Markup:

Now, before last step, we'll first check our site's Twitter Card markup by using Card Preview utility so that you can ensure your META tags are used in a valid fashion.

On the tester page, enter the URL of one of your posts (NOT your home page, Twitter Cards only work on post pages) and click "Preview Card".

Applying for Twitter Card Approval:

Twitter requires that your domain be approved before they will allow Twitter Cards for your site;  this is likely to combat abuses like pornography and sites promoting illegal activity.You can apply for your domain by clicking here.

In application form, put bunch of basic information about your blog or site. Submit your application, And soon your Twitter Card will automatically work.

Don't forget to tweet me your blog's link so I may review your Twitter Card. Also, don't forget to leave your comments...

Thursday, 21 February 2013

CSS Lava Lamp Menu For Blogger


Yesterday, I found this excellent CSS menu, which bases on "Lava Lamp Menu" concept. Also, this menu is available for download or demo at this link. In September, we shared a jquey based Lava Lamp menu, which was based on jQuery.

This menu is available in three different styles, you can check a demo at this link. This menu is created by Paulina Hetman from Pepsized. This menu is coded so beautiful, and basic mark-up of all three menus are same.

First two menus are pure CSS based and third menu uses a heart and arrow image, which is adorable (Just kidding :p).

Add This Menu To Blogger:

  • Go To Blogger > Template > Edit HTML > Click on "Proceed."
  • Search for ]]></b:skin> and post following css just above it:

/* --- for all three examples ----*/

.nav {
  text-align: center;
  overflow: hidden;
  margin: 2em auto;
  width: 480px;
  position: relative; }
  .nav a {
    display: block;
    position: relative;
        float: left;
        padding: 1em 0 2em;
    width: 25%;
        text-decoration: none;
      color: #393939;
      -webkit-transition: .7s;
      -moz-transition: .7s;
      -o-transition: .7s;
      -ms-transition: .7s;
      transition: .7s; }
      .nav a:hover {
        color: #c6342e; }

.effect {
    position: absolute;
  left: -12.5%;
  -webkit-transition: 0.7s ease-in-out;
  -moz-transition: 0.7s ease-in-out;
  -o-transition: 0.7s ease-in-out;
  -ms-transition: 0.7s ease-in-out;
  transition: 0.7s ease-in-out; }

    .nav a:nth-child(1):hover ~ .effect {
      left: 12.5%; }
    .nav a:nth-child(2):hover ~ .effect {
      left: 37.5%; }
    .nav a:nth-child(3):hover ~ .effect {
      left: 62.5%; }
    .nav a:nth-child(4):hover ~ .effect {
      left: 87.5%; }

/* ----- line example -----*/

.ph-line-nav .effect {
  width: 90px;
  height: 2px;
  bottom: 36px;
  background: #c6342e;
  box-shadow: 0 1px 0 white;
  margin-left:-45px;
}

/* ----- dot example -----*/

.ph-dot-nav:after {
  content: "";
  display: block;
  position: absolute;
  width: 100%;
  height: 1px;
  background: #c6342e;
  bottom: 40px; }
.ph-dot-nav a:after {
  content: "";
  position: absolute;
  width: 4px;
  height: 4px;
  bottom: 38px;
  left: 50%;
  margin-left: -2px;
  background: #c6342e;
  border-radius: 100%; }
.ph-dot-nav .effect {
  width: 10px;
  height: 10px;
  bottom: 36px;
    margin-left: -5px;
  background: #c6342e;
  border-radius: 100%; }

/* ----- heart example -----*/

.ph-heart-nav .effect, .ph-heart-nav a:after, .ph-heart-nav a:before {
  background: url('https://blogger.googleusercontent.com/img/b/R29vZ2xl/AVvXsEgypDTU3dQfrADAzdL1jBL-uasgRdoGOi8eoCaWdzAADif6IQ-eV4TxdQkUrE-xWutf4PC_xhsvK0WJBM2iyhTF9qCc1TisIceohG_um9HLBf8vFFoJGvaXH0_Wv-gKHEBIFreWGSlEncg/s1600/heart.png') no-repeat; }
.ph-heart-nav .effect {
  position: absolute;
  bottom: 26px;
  background-position: 0 0;
  height: 8px;
  width: 62px;
  margin-left:-31px; }

.ph-heart-nav a:before {
  content: "";
  display: block;
  position: absolute;
  left: 50%;
  bottom: 20px;
  background-position: -62px 0;
  height: 20px;
  width: 11px;
  margin-left: -11px; }

.ph-heart-nav a:after {
  content: "";
  display: block;
  position: absolute;
  left: 50%;
  bottom: 20px;
  z-index: 1;
  background-position: -73px 0;
  height: 20px;
  width: 11px; }

  • Save Template....All done with template editing. Now, it's time to edit you layout.
  • Go To Blogger > Layout > Add A Widget > HTML/JavaScript
  • Paste any of the following code:

First Style:

    <div class="ph-line-nav nav">
        <a href="#">Home</a>
        <a href="#">About</a>
        <a href="#">Gallery</a>
        <a href="#">Contact</a>
        <div class="effect"></div>
    </div>

Second Style:

    <div class="ph-dot-nav nav">
        <a href="#">Home</a>
        <a href="#">About</a>
        <a href="#">Gallery</a>
        <a href="#">Contact</a>
        <div class="effect"></div>
    </div>

Third Style:

    <div class="ph-heart-nav nav">
        <a href="#">Home</a>
        <a href="#">About</a>
        <a href="#">Gallery</a>
        <a href="#">Contact</a>
        <div class="effect"></div>
    </div>

  • Save your widget. Now visit your blog and see the css magic.... :)

Don't forget to leave your valuable comments.....:)

Wednesday, 20 February 2013

Post Views Counter Widget For Blogger


Finally, MBT found a great way to display post view count on Blogger. We will do this by using Firebase. With Firebase you can now create dynamic and data-driven plugins for blogger without worrying about backend development. Firebase's Free plan gives you 10GB Free bandwidth and 5GB Free storage.

The postviews count wont change when you refresh the blog homepage but it will change only when you visit individual posts. This plugin will display views only once pages are visited. It is not synchronized with your Google analytics stats data, therefore it will only display correct views for the new posts that you publish.

Create Your Firebase Account And Database:

First you need to create a Firebase account to use this widget, which is free at this link. Fill up the easy steps sensibly and then once your account has been activated, you must create your first Firebase database.

  • Towards the bottom right side of your account, you will find the following submit box:

  • Inside this box input your desire firebase name. This generated the following firebase URL: https://example.firebaseio.com.

Installing Postviews Plugin:

  • Go To Blogger > Template > Click Edit HTML > Tick the box "Expand widget Templates"
  • Search for ]]></b:skin>
  • Just above it paste the following CSS code:

    /*-------- Post Views  ----------*/
    #views-container {
    width: 75px;
    float: right;
    }

    .mbtloading {
    background: url('https://blogger.googleusercontent.com/img/b/R29vZ2xl/AVvXsEgc5Wn8iV8T3XKzrW6q_bia_k7TKh0Olhkl8t3snEMxjMLXElRyFILWr8vlzqaQyeMx4CCKXU1yifPts2an9fgbsWvzKelvzfq8AzWREJyE_TMDoipuGqvM5Cnb_Mga2hU4lj93XTxL8BE/s1600/loading.gif') no-repeat left center;
    width: 16px;
    height: 16px;
    }

    .viewscount {
    float: right;
    color: #EE5D06;
    font: bold italic 14px arial;
    }

    .views-text {
    float: left;
    font: bold 12px arial;
    color: #333;
    }

    .views-icon{
    background: url('https://blogger.googleusercontent.com/img/b/R29vZ2xl/AVvXsEhm_xSfbai8v-mrbnf6zQr3oVzBNQOKsIG4lse6IlGh2HQq2IRcMtIo5Ugigv-WFjlqKtmJyOKImqCVGfFlKBqgeMJtIK5UFwe4Mn9LIiQHkFnmxOB2Cgxe3PyP-1cklSbvqVDoiJmgAGE/s1600/postviews.png') no-repeat left;
    border: 0px;
    display: block;
    width: 16px;
    height: 16px;
    float: left;
    padding: 0px 2px;
    }

  • Now search for </body> and just above it paste the following JavaScript code:

<!-- Post Views Script by BWidgets -->
<script type='text/javascript'>
    window.setTimeout(function() {
        document.body.className = document.body.className.replace(&#39;loading&#39;, &#39;&#39;);
      }, 10);
  </script>
<script src='https://cdn.firebase.com/v0/firebase.js' type='text/javascript'/>
<script>
$.each($(&#39;a[name]&#39;), function(i, e) {
var elem = $(e).parent().find(&#39;#postviews&#39;).addClass(&#39;mbtloading&#39;);
var blogStats = new Firebase(&quot;https://example.firebaseio.com/pages/id/&quot; + $(e).attr(&#39;name&#39;));
blogStats.once(&#39;value&#39;, function(snapshot) {
var data = snapshot.val();
var isnew = false;
if(data == null) {
data= {};
data.value = 0;
data.url = window.location.href;
data.id = $(e).attr(&#39;name&#39;);
isnew = true;
}
elem.removeClass(&#39;mbtloading&#39;).text(data.value);
data.value++;
if(window.location.pathname!=&#39;/&#39;)
{
if(isnew)
blogStats.set(data);
else
blogStats.child(&#39;value&#39;).set(data.value);
}
});
});
</script>

  • Replace the example with your firebase name. Make sure you replace it correctly. Time for the final step.  Find this code:

<data:post.body/>

  • Just above it paste the following HTML,

<!-- Post Views Counter by BWidgets-->
<div id='views-container'><span class='views-icon'/><div class='views-text'>Views:</div> <div class='mbtloading viewscount' id='postviews'/></div>

  • Hit save and you are all done!

Having Trouble?

If you are finding multi occurrences of <data:post.body/> code then choose the first occurrence. Also, this widget will only display correct views for the new posts that you publish. Thanks to MBT for this amazing script.

Sunday, 17 February 2013

Adding Disqus Combination Widget To Blogger


Previously, I shared three Disqus widget, you can check all of them at this link. Finally, It's time to share last widget of Disqus widgets series. This is a Disqus Combination widget, which is a combination of all three previous widgets. Nothing much to explain about this. Let's get started. You can also use below code on your html document or wordpress:

  • Go To Blogger > Layout > Add A Gadget > HTML/JavaScript > Paste below code:

<div class="heading blue">
            <h2>Community</h2>
        </div>
        <script type="text/javascript" src="http://wwefansnation.disqus.com/combination_widget.js?num_items=5&hide_mods=1&color=grey&default_tab=recent&excerpt_length=30"></script>
    </div>

  • Replace wwefansnation.disqus.com with your site's Disqus ID.
  • Replace 5 with the number of items your want to display.
  • Replace grey with your preferred color.
  • Replace 1 with 0 if you want to display moderator's name on this widget.

Disqus Combination Widget For WordPress:

You can download add Disqus Combination Widget to WordPress with this plugin.

Recent Posts With Scrollbar Widget For Blogger


Finally, we are back with another widget with a generator. I was trying to find this widget for my blog since I started blogging, i never got success in searching this widget. Last night, I created this widget using recent-posts-with-titles-only.js script.

This awesome script is created by blogsolute.com, and modified by madtomatoe.com. With this widget you can show upto recent 25 posts of your blog in a small box. Width of this widget is 100%, which means it automatically adjusts on your blog's sidebar. If you're sharing this post then don't forget to give me a backlink.

Below is our Widget Generator with several fields:

Friday, 15 February 2013

Reasons To Buy A Custom Domain For Your Blog

When you start blogging with Blogger or any other other free blogging platform, you get a free subdomain to kick off your blog. Soon all your visitors get familiar with your free subdomain. But when you finally decide to purchase a custom domain you get confused with several questions in mind. You start thinking whether or not you'll lose your spot in Google, reputation, rankings, and more.

You can buy a custom domain as low as $7-$8 from GoDaddy and BigRock for a full year, which is less than your internet and phone bill. Following reasons will tell you why should you buy a custom domain as soon as possible:

Reputation Among Other Bloggers:

Blogs with a custom domain, e.g. .com, .net, .org, are more respected among other bloggers than blogs with sub domains such as .blogspot.com. Nobody takes .blogspot stuff seriously, just like Twitter accounts with default profile picture.

I'd prefer to visit www.bwidgets.com rather than www.widcraft.blogspot.com. It shows that you are taking your work serious by spending some money on the service that you use and you are not just another monkey with a computer (some of them are awesome).

Easy To Remember And Share:

Blogs with a custom domain are always easy to remember. This is the reason why blogs with subdomain don't get much attention on social media, which is important in blogging. A blog with custom domain gets a good amount of traffic from social media.

Blogs with a custom domain are likely to get more shares on social media then blogs with subdomain. Let's face it, we all prefer to put gmail.com on our address bar rather than mail.google.com.

More Earning With Custom Domain:

Some big advertising sites like BuySellAds do not accept subdomains. Also, direct advertisers prefers to advertise their content on a blog with a custom domain. Believe me, you will get more for the same content with a custom domain. Also, never use GoDaddy affiliates with a free domain :p

You Can Use More Services:

That's right, you can use more services with your custom domain, e.g. Google Apps, bitly Custom Short Links, Custom Emails, and more. That's right, your domain provider will provide you one or two free emails, e.g. admin@yoursite.com. It's great to use your own email for your site. Also, you can create a short link service with your custom domain, like go.bwidgets.com.

Unlimited Subdomains:

You can create unlimited subdomains with your custom domain, such as mail.bwidgets.com. You can host your other blogs with your own custom subdomain, which is way better than using .blogspot.com domain. You can also use your subdomain in another services, such as Google Sites, Newsletters, and more.

Boost Up Your Rankings:

As more and more people notice your blog and bookmark and share it, your ranking on SERPs which is search engine results page will increase. Also, after changing your domain, you'll loose your PageRank only at temporary basis. Once Google robots locate all your redirected links, your rankings will be granted back to you on next PageRank update.

Still here? Just visit GoDaddy or BigRock to buy a custom domain for your blog. Don't forget to leave a comment...

Thursday, 14 February 2013

Improve Your Google PageRank


Earlier this week, I posted about Google PageRank at this link. Now, I'll tell you several ways to improve your site's Google PageRank. Your website's PageRank depends upon quality backlinks you get for your website and total count of your website pages.

1.Write Quality Content:

Everybody likes to share some good content. Create content that users want and will share with others, which will get you bunch of backlinks from other sites. Don't forget to give me a backlink from this point.

2.Guest Blogging Is A Great Move:

Seriously, guest blogging is a great way to backlink you site from an another blog or site. Also, don't forget to submit your articles to various web directories and forums. Good content never goes waste. You can also submit a guest post for our blog at this link.

3.Publicize Your Site Everywhere:

Add your site’s URL, e.g. www.bwidgets.com, into your content. Never miss a change to show off, e.g., newsletter, business cards, email signatures, press releases and more.

4.Get Backlinks From High-Quality Websites:

Ask "high-quality" websites to give a backlink on their blog. It'll improve your PageRank for sure. If your site links to delisted websites, your website might also be removed from Google’s index. Always check site's reputation before asking for a backlink.

5.Check Site's Reputation Before You Link Back:

If you receive a request for a link, check the site's reputation before giving them a backlink on your site. Also, always use 'rel=nofollow' attribute to link back to delisted or low-quality website.

6.Provide RSS Feed:

RSS (Really Simple Syndication) makes it easy for other sites to distribute your headlines and content, your RSS feed will be indexed by popular Blog search engines, including BlogSearch, and Ask.com Bloglines.

7.Keep It Up:

If your site is dead for an extended period, Google may reduce the ranking of your site. Allow your visitors to submit guest posts for new articles.

8.Make Use Of rel=nofollow:

rel=nofollow attribution tell search engines "Don't follow links on this page" or "Don't follow this specific link." This means that Google does not transfer PageRank or anchor text across these links.

Here are some cases in which you might want to consider using nofollow:
  • Untrusted content: Most importantly, always use nofollow for example, untrusted user comments or guestbook entries — you should nofollow those links. Which will keep spammers away from your site.

  • Paid links: In order to prevent paid links from influencing search results and negatively impacting users, make use of nofollow.

  • Crawl prioritization: Search engine robots can't sign in or register as a member on your forum, so there's no reason to invite Googlebot to follow "register here" or "sign in" links.

9.Give Away:

Enable others to copy, distribute, and make use of your articles and content, as long as they give your site credit. Also, write newsletter to remind your visitors about your site. Create an embed-able widget of your site for your users.

10.Never Try To Cheat Google:

If Google suspects that you are trying to deceive it web crawler and thus its users by including hidden text, misleading or repeated words, pages that don’t match your sites description, deceptive redirects, duplicate site or pages, or other disingenuous tactics, then Google may delist your site from its index.

Wednesday, 13 February 2013

Using Custom Short Domain With bitly


bitly (bit.ly or bitly.com) is a URL shortening and bookmarking service owned by Bitly, Inc., a Betaworks company. The current CEO is Peter Stern. It offers URL redirection service with real-time link tracking.

It's always a great move to use your own url shortner, bitly allows you to use your own custom domain to create short links for free. Google Short Links is also a great way to build your own custom url shortner but the fact is that Google Short Links is no more a free product. Still, you can check our Google Short Links at go.bwidgets.com.

A custom short domain is a great way to brand your content across the web! For example, the New York Times uses "nyti.ms" as a custom short domain, and TechCrunch uses "tcrn.ch".

If you were to use "example.me" as a custom domain, instead of appearing like this: bitly.com/example

your links would appear like this: example.me/example

Purchase A Domain:

BigRock is a great place to begin your search for exotic short domains. Your short domain name needs to be 15 characters or less (including the dot). You can also use your existing domain or a sub-domain. Wikipedia maintains a list of top-level domains (TLDs).

Using Custom Domain:

For using your top-level domain (example: bwidgets.com), you need to update your "A-Records" and "CNAME Records." Your domain name must be 15 characters or less (including the dot):

  • Log into your domain registrar's website.
  • Select the short domain you want to modify.
  • Find the section for managing DNS entries. The name of this section varies, but is usually something like "DNS Configuration," "DNS Records", "Advanced DNS," "Total DNS", "Host records," or similar.


Add or edit the existing A-Record for your site. You can click on images for a larger look. Also, don't copy any other IP or anything from images. There all are just for example, I'am not really editing any records DNS records.


Edit the existing A-Record for your site and change the IP address to 69.58.188.49 If there is no existing A record (which is uncommon), add a new one. The A record's "host name" should be either the character @ or your base domain (both mean the same thing). You should only have one A Record. If you have more than one, remove all others and leave only the one pointing to bitly's IP.


After editing A-Records, it's time to add a CNAME Record in your DNS.


In your DNS, enter "www" as your host name name, and that it points to value 'cname.bitly.com'. For example, if your short domain was 'fred.me' you'd point your CNAME record for 'www.fred.me' to 'cname.bitly.com.'

All done in your DNS Manager. Now, scroll down to the "adding your domain to bitly" point for next step.

Using Custom Sub-Domain:

For using your sub-domain (example: sl.bwidgets.com), you need to update your "CNAME Records." Your domain name must be 15 characters or less (including the dot):

  • Log into your domain registrar's website.
  • Select the short domain you want to modify.
  • Find the section for managing DNS entries. The name of this section varies, but is usually something like "DNS Configuration," "DNS Records", "Advanced DNS," "Total DNS", "Host records," or similar.


In your CNAME Reconds, click on "Add CNAME Record." Every domain registrar has their on unique look.


In Host Name, put your desire sub-domain name (example: sl.bwidgets.com). In Value, put cname.bitly.com. All done in your CNAME Records. Now, it's time to add your domain to bigly.

Add Your Domain To bitly:

After setting up your custom domain, it's time to add your domain to bitly. It can take up to 48 hours for domain changes to propagate. It's easy:


Sign in to your bitly account, go to "settings" from the upper right pull-down menu, (or click here) and click on "Advanced" tab.


Enter your short domain under under "Custom Short Domain." (Located under the "Advanced" tab.)


Now, in this screen, you'll see instruction that we mentioned earlier on this tutorial. However, don’t take this step until you have updated your DNS Records. If you've already completed DNS setup, which we mentioned above then click on "Verify" button.


After clicking on "Verify," you'll see above screen. That's IT!!!

If bitly is showing some sort of error then try to double check all steps. Also, DNS changes can take up to 48 hours for domain changes to propagate. In my case, it took about two hours to update DNS. Now, your sub-domain or domain's root directory will redirect you to bitly's homepage. Don't forget to leave a comment....

Sunday, 10 February 2013

What Is Google PageRank And Why Should I Use It?


What Is Google PageRank?

Google PageRank is a link analysis algorithm, named after Larry Page and used by Google Search. Your website's PageRank depends upon quality backlinks you get for your website and total count of your website pages.

The Google Toolbar's PageRank feature displays a visited page's PageRank as a whole number between 0 and 10. The most popular websites have a PageRank of 10. The least have a PageRank of 0.

Courtesy of Wikipedia, here is an example image of how Google PageRank works:


Mathematical PageRanks for a simple network, expressed as percentages. (Google uses a logarithmic scale.) Page C has a higher PageRank than Page E, even though there are fewer links to C; the one link to C comes from an important page and hence is of high value. If web surfers who start on a random page have an 85% likelihood of choosing a random link from the page they are currently visiting, and a 15% likelihood of jumping to a page chosen at random from the entire web, they will reach Page E 8.1% of the time. (The 15% likelihood of jumping to an arbitrary page corresponds to a damping factor of 85%.) Without damping, all web surfers would eventually end up on Pages A, B, or C, and all other pages would have PageRank zero. In the presence of damping, Page A effectively links to all pages in the web, even though it has no outgoing links of its own.


Why Should I Use It?

Google PageRank is a great way to know about, which type of sites give you a backlink. The higher a page is ranked, the better it will perform in organic search results.

If you want to generate income from search engine marketing such as paid links, pay per click or banner ads, how much you will get will largely depend on your page rank. The higher your page rank is, the higher your advertisers will pay you.

PageRank is updated every 3-6 months at Google's discretion, and therefore should not be used as a definitive way to judge the trust of a website; it only gives us an idea of the website's authority and link power based on Google's algorithm.

How To Check PageRank?

There are lots of sites, where you can check your site's PageRank. We recommend you to use PRChecker.net. In this article, we effected Wikipedia and PRChecker's PageRank, by giving them a backlink.

You can also embed your site's PageRank on your site by using following code:


<a href="http://www.prchecker.net" title="PageRank Checker"><img src="http://www.prchecker.net/lookup.php?site=http://www.bwidgets.com&badge=img1"/></a>

In above code, replace www.bwidgets.com with your site's url. Don't forget to leave a comment.

Saturday, 9 February 2013

Beautify Your CSS Code


Messy CSS codes just cause problems in coding. It's always hard to edit messy CSS files on your notepad. Well formatted CSS codes are really easy to read and edit. While creating templates, we write hundreds of CSS codes, and it's really hard for us to format all lines.

Also, when we write CSS codes for others, we really don't focus on code formatting, which cause some problems in future when we have to re-edit those stylesheets.

If you're thinking about to manually formatting you old codes, then it's just a waste of time when we can use an automatic CSS formatting tool.

CSS Beautify automatically formats your style to be consistent and easy to read. It's an open-source project from Sencha Labs. If you want then you can also download this tool at this link.

By using CSS Beautify, you'll be able to format you CSS codes in no time. It's way too much easy, even for Justin Bieber fans(no comments on this point).

Just put your messy CSS codes in first field, and you'll get beautifully formatted CSS code instantly:


Hope this will help you in future....Also, i want to share this good news with you all.

Thursday, 7 February 2013

Customized Labels Cloud Widget For Blogger


Here is a great Labels Cloud styling/widget invented my MBT. It looks a bit old-school but it's looks so beautiful in plain or white style templates. MBT widgets never gets old for sure. It for Labels Cloud widget so don't forget to choose Labels Cloud option in Layout section. Don't worry, i'll explain everything:

  • Go To Blogger > Layout > Click add a gadget and choose Labels
  • Inside the settings make sure to choose the cloud display.
  • Now save the widget and go to settings > Template
  • Click Edit HTML > Search for ]]></b:skin>
  • Just above it paste the following CSS code:

/*-----Custom Labels Cloud widget by www.BWidgets.com----*/
.label-size{
margin:0 2px 6px 0;
padding: 3px;
text-transform: uppercase;
border: solid 1px #C6C6C6;
border-radius: 3px;
float:left;
text-decoration:none;
font-size:10px;
color:#666;
}

.label-size:hover {
border:1px solid #6BB5FF;
text-decoration: none;
-moz-transition: all 0.5s ease-out;
-o-transition: all 0.5s ease-out;
-webkit-transition: all 0.5s ease-out;
-ms-transition: all 0.5s ease-out;
transition: all 0.5s ease-out;
-moz-transform: rotate(7deg);
-o-transform: rotate(7deg);
-webkit-transform: rotate(7deg);
-ms-transform: rotate(7deg);
transform: rotate(7deg);
filter: progid:DXImageTransform.Microsoft.Matrix(
                    M11=0.9961946980917455, M12=-0.08715574274765817, M21=0.08715574274765817, M22=0.9961946980917455, sizingMethod='auto expand');
zoom: 1;
}

.label-size a  {
text-transform: uppercase;
float:left;
text-decoration: none;
}
.label-size a:hover  {
text-decoration: none;
}

Save your template....All Done......Don't forget to leave a comment for any help.....

Tuesday, 5 February 2013

Adding AJAX Page Loading Effect To Blogger


AJAX is not a new programming language, but a new way to use existing standards. AJAX is the art of exchanging data with a server, and updating parts of a web page - without reloading the whole page. AJAX was made popular in 2005 by Google, with Google Suggest.

Google Suggest is using AJAX to create a very dynamic web interface: When you start typing in Google's search box, a JavaScript sends the letters off to a server and the server returns a list of suggestions. Examples of applications using AJAX: Google Maps, Gmail, Youtube, and Facebook tabs

You can also use AJAX to create some beautiful loading effects on your blogger blog. Here we go:

  • Go To Blogger > Template > Edit HTML > Click on "Proceed"
  • Find and place following code below <body>:

<div id='loading'><div id='progress-bar'></div><div id='loader'>Loading...</div></div>

  • Now add following code just above </head>:

<script charset='utf-8' src='http://widcraft.googlecode.com/svn/jquery.min.js' type='text/javascript'></script>
<script>

(function($){

$("html").removeClass("v2");


$("#header").ready(function(){ $("#progress-bar").stop().animate({ width: "25%" },1500) });
$("#footer").ready(function(){ $("#progress-bar").stop().animate({ width: "75%" },1500) });


$(window).load(function(){

    $("#progress-bar").stop().animate({ width: "100%" },600,function(){
        $("#loading").fadeOut("fast",function(){ $(this).remove(); });
    });

});
})(jQuery);
</script>

<style>
#loading {
    position: fixed;
    z-index: 50;
    top: 0; left: 0;
    width: 100%; height: 100%;
 background: #3c5a76 url(https://blogger.googleusercontent.com/img/b/R29vZ2xl/AVvXsEh1-DMF_2ELaLMFFOFWGw5wA7hTFnRimVjuZ1NftTS5Ik3tem5nDd-GMA7v1sFxfpSMyptt6qhbEoWPtIM90BTsXn4gKHFxNxVj6nKy9WpFoK9H9on6L_Xa3y7tnuyAxoe4X7ZsiJr0Pvw/s1600/Loading.gif) no-repeat center;
    line-height: 350px;
    text-align: center;
    font-size: 36px;
    color: #353231;
    text-indent: -9999px;
}
.v2 #loading { display: none; }

#progress-bar {
    position: absolute;
    top: 0; left: 0;
    background: rgb(236, 133, 0);
    opacity: 0.8;
    width: 0;
    height: 18px;
}
#loader {
 background: url(https://blogger.googleusercontent.com/img/b/R29vZ2xl/AVvXsEijoHdj8b4N4HYsdgZ5Xf8t7Cj51p8kBgOcplIV8Xse3bt2InhJi5Sidjhw-upO4DAfIce7QHeFAq-lWDBRfrBMxvpZYtj3crPvFXKQuU4hK5_gelnF1SAqe0667mph2Irnif15ensDcJE/s1600/BWidgets.png) no-repeat center 25%;
 height: 100%;
 display: block;
}
</style>

Save your template and see the magic....Don't forget to leave a comment....

Saturday, 2 February 2013

Remove Attribution Widget From Blogger Mobile Template


In our last post, we discussed how to remove attribution widget from blogger. In this post, we'll discuss how to remove attribution widget from blogger mobile template.

In previous post, we showed you how to remove attribution widget from your blog but that widget can still be viewed by visiting your mobile template (If you're using). After searching on Google for hours i found nothing about this topic, so i invented my own way to do this.

In last trick, we removed this widget, now we'll hide'em. Without wasting any time, let's get started:

  • Go To Blogger > Template > Edit HTML > Proceed
  • Find and remove following code from your template:

<b:widget id='Attribution1' locked='true' title='' type='Attribution'/>

  • Find </body> in your template and just above it paste following code:

<div style='display:none;'>
<b:section class='hiddenbar' id='hiddenbar' preferred='no'>
<b:widget id='Attribution1' locked='true' mobile='no' title='' type='Attribution'/>
</b:section>
</div>

  • Save your template, it's done.

Let me explain this, instead of removing attribution widget, we hid this widget with css. If you only add mobile='no' property in your attribution, instead of this code, it'll only remove this widget from your mobile template. If you're copying this tutorial, then don't forget to give us a backlink on your post. Also, don't forget to leave a comment.

Remove Attribution Widget From Blogger


Today I'll show you how to remove attribution (Powered by Blogger) widget from your blog. It's always hard for newbies to remove this widget but don't worry about that.

In this tutorial, you'll learn about removing locked widget from your blog, just like Attribution widget. Not much to explain, let's get started:

  • Go To Blogger > Template > Edit HTML > Proceed:
  • Find following code in your  template:

<b:widget id='Attribution1' locked='true' title='' type='Attribution'/>

  •  Now, just replace locked='true' in above code with locked='false'. Save your template.

Now your attribution widget in unlocked. If you want remove, then you can remove it from your layout section. In next post, i'll show you how to removing attribution widget from your mobile template.

Thursday, 31 January 2013

Display Your Feed On A HTML Page


About every blogger now is using feedburner to publish their feed. By using feedburner, you can get realtime stats and subscriber count. You can even use a custom domain with feedburner. You can display your feedburner feed on Blogger with a simple feed widget but you can't use that widget on your html site. Don't worry, you can still display your feed on a static html or your website by using BuzzBoost. Here we go:

Go To FeedBurner > Click on your feed:


Click on the "Publicize" tab, and then click on "BuzzBoost" in the list at the left side of the screen (see image below). At this point BuzzBoost will give you a number of different options. Choose your preference and click on "Active" button. If you’ve already activated BuzzBoost you’ll see the option to save instead of activate.


Once you choose your settings and activate BuzzBoost you will be provided with the piece of code. Copy the code provided by FeedBurner and paste it into your page wherever you want it to be displayed. You're completely free to use my feeds on your blog:

<script src="http://feeds.feedburner.com/WidgetCraft?format=sigpro" type="text/javascript" ></script><noscript><p>Subscribe to RSS headline updates from: <a href="http://feeds.feedburner.com/WidgetCraft"></a><br/>Powered by FeedBurner</p> </noscript>

It's done, you can also style this code by using some css:

.feedTitle {
background: none repeat scroll 0% 0% whitesmoke;
padding: 10px;
text-align: center;
font-size: 20px;
font-weight: bold;
border: 1px solid rgb(81, 104, 59);
}
.feedburnerFeedBlock ul {
margin-left:0;
padding-left:0;
list-style-type: none;
}

.feedburnerFeedBlock ul li {
padding: 5px;
border-bottom-width: 1px;
border-bottom-style: solid;
border-bottom-color: #E0E0E0;
}

.feedburnerFeedBlock ul li span.headline a {
color: #990000;
text-decoration: none;
display: block;
}

.feedburnerFeedBlock ul li span.headline a:hover {
color: #535353;
}

#creditfooter {
display: none;
}

Tuesday, 29 January 2013

Create A Free Android App For Your Blog


Android is a Linux-based operating system designed primarily for touchscreen mobile devices such as smartphones and tablet computers. Initially developed by Android, Inc., which Google backed financially and later purchased in 2005.

It's really great idea to create a native Android app for your blog. In this tutorial I'll show you how to create an Android app without any App Development knowledge. Download an example at this link.

AppsGeyser is a free service that converts your content into an App and makes you money. Your app will have all you need including messaging, social sharing, tabs and full support for HTML5 enhancements.

Visit AppsGeyser and Sign Up. After signing up, click on 'Create App' button. You'll see a big list of app tabs. Now we have to choose a suitable tab for our app. I'll tell you about two different methods:

Using Mobile Site

If you're using Blogger Mobile template or you have a mobile version of your site then you can choose 'Website' option:


In next page fill up your site details and preference (I'll use my second blog WWE Fans Nation to explain this tutorial):


In Website URL section fill your mobile sites url (http://www.yourblog.com?m=1 for blogger users.) Fill all fields and then click on 'Create App' button. It's Done!!! In next page you'll receive downloading link and more options about your app. You can download this app by clicking here.

Using Feed

You can also create an Android app using your blog's feed. Click on 'Create App' button and in next page choose 'NEWS Feed' option:


Hope you're using feeds on your blog. In next page fill up your feed's url and some details:


Now fill your feed url (Ex: http://feeds.feedburner.com/WWEFansNation) and fill your app's details. After completing this form click on 'Create App' button. In next page you'll receive downloading link and more options about your app. You can download this app by clicking here.

You can add more than one tabs to your app. Also, you can monetize your Android app using AppsGeyser's publishers program.

You can also publish your app on Google Play by paying one time 25$ fee. Don't forget to leave a comment.

Wednesday, 23 January 2013

Stylish CSS Sprites Menu For Blogger

It's always hard to find a suitable menu for your blog. We're making that decision more hard for you by sharing another awesome menu... :p Remember, you can't change menu option, because it's an image based menu. Here we go:

  • Go To Blogger > Template > Edit HTML > Find ]]></b:skin>.
  • Just above ]]></b:skin> post following css:

/*Menu Stars BWidgets.com */
.bwidgets-nav {
    display:block;
    height:72px;
    margin:30px auto;
    position:relative;
    width:525px; }
.bwidgets-nav ul {
    float:none;
    list-style-image:none;
    list-style-type:none;
    margin:3px 0; }
.bwidgets-nav ul li {
    background-image:url('https://blogger.googleusercontent.com/img/b/R29vZ2xl/AVvXsEhdoeMzNPpTXbvyIK9XVcaPLMaIhPyECOa_ZkXtlYYXdu1DqXelgqfZhxHE9Ps3pQcNvJU6MsF1FRkgyF9aPSF5-FTLhZUMgTU32xvQK_9YRann8kyme9ND8jXlg-9vDc28lmAL2s0yW9I/s1600/SpritesMenu.png');
    background-repeat:no-repeat;
    float:left;
    height:72px;
    margin:0px;
    padding-top:5px;
    position:absolute; }
.bwidgets-nav ul li a {
    display:block;
    height:100%;
    width:100%; }
.bwidgets-nav ul li.sm1 {
    background-position:0 0;
    left:0px;
    width:125px; }
.bwidgets-nav ul li.sm2 {
    background-position:-125px 0;
    left:100px;
    width:124px; }
.bwidgets-nav ul li.sm3 {
    background-position:-249px 0;
    left:200px;
    width:124px; }
.bwidgets-nav ul li.sm4 {
    background-position:-373px 0;
    left:300px;
    width:125px; }
.bwidgets-nav ul li.sm5 {
    background-position:-498px 0;
    left:400px;
    width:126px; }
.bwidgets-nav ul li:hover {
    z-index:1000; }
.bwidgets-nav ul li.sm1:hover {
    background-position:0 -75px; }
.bwidgets-nav ul li.sm2:hover {
    background-position:-125px -75px; }
.bwidgets-nav ul li.sm3:hover {
    background-position:-249px -75px; }
.bwidgets-nav ul li.sm4:hover {
    background-position:-373px -75px; }
.bwidgets-nav ul li.sm5:hover {
    background-position:-498px -75px; }
/*Menu Ends BWidgets.com */

  • Now save your template...
All done with this past, now it's time to add html mark-up of this menu on your layout.

  • Go To Blogger > Layout > Add A Gadget > HTML/JavaScript > Paste following code:

<div class="bwidgets-nav">
<ul>
<li class="sm1"><a href="#"></a></li>
<li class="sm2"><a href="#"></a></li>
<li class="sm3"><a href="#"></a></li>
<li class="sm4"><a href="#"></a></li>
<li class="sm5"><a href="#"></a></li>
</ul>
</div>

Replace all # in above code with your links.....Save It.......

Don't forget to leave a comment.... :)

Sunday, 20 January 2013

We Are Now Accepting Guest Posts


It's time for me to take some rest, while you can get featured on TricksPanda.com & BWidgets by writing a guest post for our blog. It's a great way to promote your blog or profiles. You'll be free to write any legal thing on your guest post.

How To Submit?

It's easy, just email me your guest post on contact[at]bwidgets.com. (.html or .zip)

You'll Get...

You'll get full credit of your guest post, also a backlink to your blog. Don't forget to email me your name and website. I'll also post "About Author" column below your guest post. It's great way to get more fans.

More Info:

Niche:

  • Blogging
  • Web Designing
  • Internet
  • Android
  • Google
  • Social Media
  • Money Blogging
  • WordPress

Supported formats:

  • .zip
  • .html
  • .txt

By submitting a guest post you accept:

  • It's an original and fresh post. (No Copycats Allowed)
  • We can modify your post. (Only to make some changes, not much)
  • Your post is totally legal. (Only legal posts accepted. Not for hackers.)
  • I'am Awesome. (Most important point)

Saturday, 19 January 2013

Blogger File Hosting Solution


Unlike WordPress, Blogger doesn't provides file hosting. You can only upload images on your blog via Picasa. Every blog owner needs some kind of file hosting to host their scripts, projects, documents and all. In this post, I'll discuss upload several sites, which provides free file hosting. All sites are powered by Google.

Picasa: Picasa is Google's official image hosting website, where you can host all your images. It's totally free and it works via Blogger's image uploader. Your blog's all images are hosted in Picasa.

YouTube: YouTube is Google's video hosting website also world's #1 video hosting website. You upload and embed your videos on your blog via YouTube. It's a great way to promote your blog with your videos. It's totally free, and you can also earn some money via YouTube.

Google Code: Google Code is best place for all developers. You can host your js, css, html, swf, zip, images, txt and bunch of more files formats on Google Code. Google Code is also totally free and it provides 4GB space. You can learn about hosting your files on Google Code on our site.

Google Sites: Google Sites is a free and easy way to create and share webpages. You can also hosts your files on Google Sites. It supports css, js, zip, swf, images and bunch more files formats. It provides 100MBs of free storage per site. You can create unlimited sites on Google Sites. Best part of Google Sites is that you can use your custom domain.

Google Drive: Google Drive is a file storage and synchronization service by Google. Google Drive gives all users 5 GB of cloud storage to start with. A user can get additional storage, which is shared between Picasa and Google Drive, from 25 GB up to 16 TB through a paid monthly subscription plan. It supports images, videos, html, js, css and more. You can learn more about Google Drive's supported file formats at this link.

Wednesday, 16 January 2013

How To Screen Capture Your Android


So recently i bought a new Android phone, and i was trying to capture above screenshot. It's going to be a very useful tutorial for you. We just need a free software from Google Play. You don't need a rooted for this tutorial. First go and download Screen Capture Shortcut from Google Play. After downloading and installing open the software:

As you can see in above picture, In first option (Capture From Notification) select Yes. Now your software is totally activated and you can capture image any time. So still wondering who to capture?

Now when you want to capture any screenshot just slide your notification bar down:

As you can see in above picture, after clicking on 'Screen Capture Shortcut,' your phone will capture your screen in 0.5 seconds.

You can also change notification type, capture time and all other options in your app. Hope this will work you...Don't forget to leave a comment...

Popular Posts

 
Powered by Blogger.