


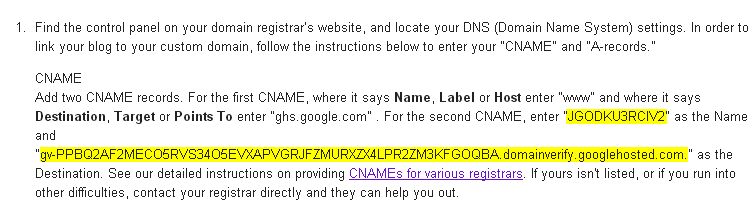
So i recently created a new blog with lots of CSS3 demos and projects and to promote that i'am posting this post with twenty awesome CSS3 posts from my blog.


<b:include data='post' name='post'/>
<!--Post Titles Only Trick-->
<b:if cond='data:blog.pageType == "index"'>
<h3 class='title-only'><a expr:href='data:post.url'><data:post.title/></a></h3>
<b:else/>
<b:include data='post' name='post'/>
</b:if>
<!--www.BWidgets.com-->

/* -- Homepage Title Styling -- */
.title-only{
background: whiteSmoke;
padding: 10px;
color: black;
margin: 0;
border-bottom: dotted 2px;
}
.title-only:hover {
background: white;
}

/*-----Search One Starts-----*/
input{
font-family: cursive;
}
form.search1 {
background: url(https://blogger.googleusercontent.com/img/b/R29vZ2xl/AVvXsEivF8CSxrNrPmcKiMtVNjm8qsUWpxs4ucmqwCw9jcvsdaBu6cvbfUnxZiC2_1zVhOUlHBlRV2QVoVrsrxvbyk1W_qRpYJDetC1MW68JNlWaOqM8WysSCPiRVYjr9lVfYnJpKLRCiPBKi94/s1600/1.png);
width: 320px;
height: 38px;
}
.text1 {
background: transparent;
width: 275px;
height: 38px;
border: 0px;
outline: 0px;
padding: 5px;
font-size: 20px;
}
.submit1 {
background: transparent;
border: 0px;
height: 38px;
position: relative;
width: 41px;
top: -12;
cursor: pointer;
}
/*-----Search One Ends-----*/
/*-----Search Two Starts-----*/
form.search2 {
background: url(https://blogger.googleusercontent.com/img/b/R29vZ2xl/AVvXsEj0Lw5Foy_jFFJvgNgB6XmHHNSt9LKNe6otKTREqmVK88rlg_OVU24yL384kANiM5l7xlyJV_UMTvS-38GTt9MclL0cVYGkP-zfs9JI2gnxBp162lXyx1m8L5MF8PmwAkVyk_q6JSQ6aU0/s1600/2.png);
width: 320px;
height: 38px;
}
.text2 {
background: transparent;
width: 270px;
height: 38px;
border: 0px;
outline: 0px;
padding: 5px;
font-size: 20px;
}
.submit2 {
background: transparent;
border: 0px;
height: 38px;
position: relative;
width: 45px;
top: -12;
cursor: pointer;
}
/*-----Search Two Ends-----*/
/*-----Search Three Starts-----*/
form.search3 {
background: url(https://blogger.googleusercontent.com/img/b/R29vZ2xl/AVvXsEiNkPhpEOEI4UG63nZOsW3ZOsvCMuL0wryAyuGHluhwc1LaKbYAEhk3BOl-DSD5UmccqgkXx0f2hVLpo2W1_F1flBRJWTBagMsshPmOkEDnHm7PZuOKK-pIel2tilYTyzFmwWDaClfA0pA/s1600/3.png);
width: 320px;
height: 38px;
}
.text3 {
background: transparent;
width: 260px;
height: 38px;
border: 0px;
outline: 0px;
padding: 5px;
font-size: 20px;
}
.submit3 {
background: transparent;
border: 0px;
height: 38px;
position: relative;
width: 50px;
top: -12;
cursor: pointer;
left: 5px;
}
/*-----Search Three Ends-----*/
/*-----Search Four Starts-----*/
form.search4 {
background: url(https://blogger.googleusercontent.com/img/b/R29vZ2xl/AVvXsEiMFD1UNnuMZNmPLrym_DHzXbazVDBW6gFsLhkLTpJCohr9ADB27YjCsb5kwxS5OSIRoJO0aFPJ0PXze5v32G6ZmmjYlIpYy7UrKHfiFRM9NEz-iNHRmeFXdGrWBYW_8Jb8nvJvc1jzhWQ/s1600/4.png);
width: 334px;
height: 49px;
}
.text4 {
background: transparent;
width: 290px;
height: 38px;
border: 0px;
outline: 0px;
padding: 10px 0 0 10px;
font-size: 20px;
}
.submit4 {
background: transparent;
border: 0px;
height: 38px;
position: relative;
width: 40px;
top: -12;
cursor: pointer;
}
/*-----Search Four Ends-----*/
/*-----Search Five Starts-----*/
form.search5 {
background: url(https://blogger.googleusercontent.com/img/b/R29vZ2xl/AVvXsEiS7nuPxbEtbeXaBckBD8xFS-3p7mfpjAyrqcvbZRBtFqmLJfBUasLOLqq7a1nhz-yn6peeyugiXty9yWN9ajGSdS9w7NtUW_ahZr5Mv_RlfwcYAvVcWWoEJiTWvCTpvmbPW9-BDqoc_zA/s1600/5.png);
width: 320px;
height: 32px;
}
.text5 {
background: transparent;
width: 290px;
height: 32px;
border: 0px;
outline: 0px;
padding: 10px;
font-size: 15px;
border-radius: 18px 0 0 20px;
-webkit-border-radius: 18px 0 0 20px;
-moz-border-radius: 18px 0 0 20px;
-o-border-radius: 18px 0 0 20px;
}
.submit5 {
background: transparent;
border: 0px;
height: 23px;
position: relative;
width: 25px;
top: -5px;
left: -3px;
cursor: pointer;
border-radius: 100%;
-webkit-border-radius: 100%;
-moz-border-radius: 100%;
-o-border-radius: 100%;
}
<form class="search1" action="/search" style="method="get">
<input class="text1" type="text" name="q" value="Search Here" onclick="value=''" />
<input class="submit1" type="submit" value="" />
</form>
<form class="search2" action="/search" style="method="get">
<input class="text2" type="text" name="q" value="Search Here" onclick="value=''" />
<input class="submit2" type="submit" value="" />
</form>

The Internet has connected more than two billion people around the world. Some governments want to use a closed-door meeting in December to increase censorship and regulate the Internet. Join together to keep the Internet free and open.
A free and open world depends on a free and open Internet. Governments alone, working behind closed doors, should not direct its future. The billions of people around the globe who use the Internet should have a voice.


<section class="credit-card visa gr-visa">
<div class="logo">Visa</div>
<form>
<h2>Payment Details</h2>
<ul class="inputs">
<li>
<label>Card Number</label>
<input type="text" name="card_number" pattern="[0-9]{13,16}" value="9842 9472 9457 9472" onclick="value=''" class="full gr-input" required />
</li>
<li class="expire last">
<label>Expiration</label>
<input type="text" name="expire_month" value="December (12)" onclick="value=''" size="10" class="month gr-input" required />
<input type="text" name="expire_year" value="2014" onclick="value=''" size="10" class="year gr-input" required />
<div class="clearfix"></div>
</li>
<li class="cvc-code last">
<label>CVC Code</label>
<input type="text" name="cvc_code" value="174" onclick="value=''" size="10" class="gr-input" required />
</li>
<div class="clearfix"></div>
</ul>
</form>
<div class="watermark">Visa</div>
</section>
/* === Basic reset === */
* { margin: 0; padding: 0; outline: none; box-sizing:border-box; }
a>img { border: none; }
header, footer, article, section, nav, aside { display: block; }
/* === General === */
body {
font-family:Arial;
font-size: 14px;
background:#ddd;
}
.clearfix {
clear:both;
}
/* === Credit Card === */
.credit-card {
display:block;
position:relative;
width:93.75%; /* This is 300px on 320px wide screen */
max-width:500px; /* Just to make sure that it doesnt get crazy on bg screens */
min-width:300px; /* And make sure that it contains at least some size */
margin:30px auto;
padding:20px;
overflow:hidden;
border-radius:6px;
z-index:1;
}
.credit-card .inputs {
list-style:none;
margin-top:30px;
}
.credit-card .inputs li {
margin-bottom:30px;
}
.credit-card .inputs li.last {
margin-bottom:10px;
}
.credit-card .inputs li.expire {
float:left;
width:70%;
margin-right:5%;
}
.credit-card .inputs li.expire input{
float:left;
width:35%;
}
.credit-card .inputs li.expire input.month{
width:60%;
margin-right:5%;
}
.credit-card .inputs li.cvc-code {
float:left;
width:25%;
}
.credit-card .inputs li.cvc-code input {
width:100%;
}
.credit-card .watermark {
position:absolute;
z-index:10;
}
.credit-card form {
position:relative;
z-index:50;
}
.credit-card .logo {
position:absolute;
top:15px;
right:20px;
text-transform:uppercase;
font-weight:bold;
}
/* === Visa === */
.visa {
color:#fff;
box-shadow: 0px 0px 4px rgba(0,0,0,0.8), inset 0px 1px 3px rgba(255,255,255,0.3), inset 0px 0px 2px rgba(255,255,255,0.2);
}
.visa h2 {
text-shadow:1px 1px 2px rgba(17,121,173,0.8);
}
.visa .logo {
color:rgba(255,255,255,0.9);
font-size:2em;
font-style:italic;
text-shadow:0px 0px 3px rgba(17,123,173,0.9);
}
.visa .logo:after {
content:' ';
position:absolute;
left:0px;
top:5px;
width: 0;
height: 0;
border-top: 10px solid orange;
border-left: 10px solid transparent;
}
.visa .watermark {
bottom:-100px;
left:-50px;
color:rgba(255,255,255,0.06);
font-size:20em;
font-weight:bold;
font-style:italic;
}
/* === Forms === */
label {
display:block;
margin-bottom:8px;
color:rgba(255,255,255,0.6);
text-transform:uppercase;
font-size:1.1em;
font-weight:bold;
text-shadow:0px 1px 2px rgba(17,123,173,0.6);
}
input {
display:block;
padding:12px 10px;
color:#999;
font-size:1.2em;
font-weight:bold;
text-shadow:1px 1px 1px #fff;
border:1px solid rgba(16,103,133,0.6);
box-shadow:0px 0px 3px rgba(255,255,255,0.5), inset 0px 1px 4px rgba(0,0,0,0.2);
border-radius:3px;
}
input.full {
width:100%;
}
/* === Gradients === */
.gr-visa {
background: #1db1cf; /* Old browsers */
background: -moz-linear-gradient(top, #1db1cf 0%, #1078ab 100%); /* FF3.6+ */
background: -webkit-gradient(linear, left top, left bottom, color-stop(0%,#1db1cf), color-stop(100%,#1078ab)); /* Chrome,Safari4+ */
background: -webkit-linear-gradient(top, #1db1cf 0%,#1078ab 100%); /* Chrome10+,Safari5.1+ */
background: -o-linear-gradient(top, #1db1cf 0%,#1078ab 100%); /* Opera 11.10+ */
background: -ms-linear-gradient(top, #1db1cf 0%,#1078ab 100%); /* IE10+ */
background: linear-gradient(to bottom, #1db1cf 0%,#1078ab 100%); /* W3C */
filter: progid:DXImageTransform.Microsoft.gradient( startColorstr='#1db1cf', endColorstr='#1078ab',GradientType=0 ); /* IE6-9 */
}
.gr-input {
background: #d3d3d3; /* Old browsers */
background: -moz-linear-gradient(top, #d3d3d3 0%, #d9d9d9 38%, #e5e5e5 82%, #e7e7e7 100%); /* FF3.6+ */
background: -webkit-gradient(linear, left top, left bottom, color-stop(0%,#d3d3d3), color-stop(38%,#d9d9d9), color-stop(82%,#e5e5e5), color-stop(100%,#e7e7e7)); /* Chrome,Safari4+ */
background: -webkit-linear-gradient(top, #d3d3d3 0%,#d9d9d9 38%,#e5e5e5 82%,#e7e7e7 100%); /* Chrome10+,Safari5.1+ */
background: -o-linear-gradient(top, #d3d3d3 0%,#d9d9d9 38%,#e5e5e5 82%,#e7e7e7 100%); /* Opera 11.10+ */
background: -ms-linear-gradient(top, #d3d3d3 0%,#d9d9d9 38%,#e5e5e5 82%,#e7e7e7 100%); /* IE10+ */
background: linear-gradient(to bottom, #d3d3d3 0%,#d9d9d9 38%,#e5e5e5 82%,#e7e7e7 100%); /* W3C */
filter: progid:DXImageTransform.Microsoft.gradient( startColorstr='#d3d3d3', endColorstr='#e7e7e7',GradientType=0 ); /* IE6-9 */
}

<div class="post">
BWidgets: Visit BWidgets.com for more!
<br><br>
Try resizing me or my media friend below.
</div>
<div class="post photo">
<img src="https://blogger.googleusercontent.com/img/b/R29vZ2xl/AVvXsEhdnaYZS3oYX3BuVH5nd3Q80LXSvfIrIMfrA9K1dQfncaF2gnguilf-8MXMoMFWLHTiCSSf6xR_aA-Yy6YGQW7v9tUbIPd5SO587NJpCzzEIETVTBqmGBAY5ByJIWkKtfVXiV72gLdTttU/s1600/Google+++Style+Subscription+Box+Widget+For+Blogger.jpg">
</div>
body {
width: 240px;
height: 200px;
margin: 0px auto;
padding: 40px 0 0;
background-color: #fff;
font-family: Verdana, sans-serif;
font-size: 11px;
}
.post {
margin: 0px 0px 40px;
padding: 15px;
position: relative;
background-color: #fff;
-webkit-box-shadow: 0 1px 3px rgba(100, 100, 100, 0.4), 0 0 40px rgba(100, 100, 100, 0.1) inset;
-moz-box-shadow: 0 1px 3px rgba(100, 100, 100, 0.4), 0 0 40px rgba(100, 100, 100, 0.1) inset;
box-shadow: 0 1px 3px rgba(100, 100, 100, 0.4), 0 0 40px rgba(100, 100, 100, 0.1) inset;
overflow: hidden;
resize: both;
}
.photo img {
width: 100%; height: 100%;
}

<canvas id="canvas"></canvas>
body {
margin: 0;
padding: 0;
overflow: hidden;
}
#canvas {
background: black;
}
window.requestAnimFrame = (function(){
return window.requestAnimationFrame ||
window.webkitRequestAnimationFrame ||
window.mozRequestAnimationFrame ||
window.oRequestAnimationFrame ||
window.msRequestAnimationFrame ||
function( callback ){
window.setTimeout(callback, 1000 / 60);
};
})();
var canvas = document.getElementById("canvas"),
ctx = canvas.getContext("2d"),
keyword = "BWidgets.com",
imageData,
density = 3,
mouse = {},
hovered = false,
colors = ["0,120,232", "8,200,255", "30,140,255"],
minDist = 20,
bounceFactor = 0.7;
var W = window.innerWidth,
H = window.innerHeight;
canvas.width = W;
canvas.height = H;
document.addEventListener("mousemove", function(e) {
mouse.x = e.pageX;
mouse.y = e.pageY;
}, false);
// Particle Object
var Particle = function() {
this.w = Math.random() * 10.5;
this.h = Math.random() * 10.5;
this.x = -W;
this.y = -H;
this.free = false;
this.vy = -5 + parseInt(Math.random() * 10) / 2;
this.vx = -4 + parseInt(Math.random() * 8);
// Color
this.a = Math.random();
this.color = colors[parseInt(Math.random()*colors.length)];
this.setPosition = function(x, y) {
this.x = x;
this.y = y;
};
this.draw = function() {
ctx.fillStyle = "rgba("+this.color+","+this.a+")";
ctx.fillRect(this.x, this.y, this.w, this.h);
}
};
var particles = [];
// Draw the text
function drawText() {
ctx.clearRect(0, 0, W, H);
ctx.fillStyle = "#000000";
ctx.font = "100px 'Arial', sans-serif";
ctx.textAlign = "center";
ctx.fillText(keyword, W/2, H/2);
}
// Clear the canvas
function clear() {
ctx.clearRect(0, 0, W, H);
}
// Get pixel positions
function positionParticles() {
// Get the data
imageData = ctx.getImageData(0, 0, W, W);
data = imageData.data;
// Iterate each row and column
for (var i = 0; i < imageData.height; i += density) {
for (var j = 0; j < imageData.width; j += density) {
// Get the color of the pixel
var color = data[((j * ( imageData.width * 4)) + (i * 4)) - 1];
// If the color is black, draw pixels
if (color == 255) {
particles.push(new Particle());
particles[particles.length - 1].setPosition(i, j);
}
}
}
}
drawText();
positionParticles();
// Update
function update() {
clear();
for(i = 0; i < particles.length; i++) {
var p = particles[i];
if(mouse.x > p.x && mouse.x < p.x + p.w && mouse.y > p.y && mouse.y < p.y + p.h)
hovered = true;
if(hovered == true) {
var dist = Math.sqrt((p.x - mouse.x)*(p.x - mouse.x) + (p.y - mouse.y)*(p.y - mouse.y));
if(dist <= minDist)
p.free = true;
if(p.free == true) {
p.y += p.vy;
p.vy += 0.15;
p.x += p.vx;
// Collision Detection
if(p.y + p.h > H) {
p.y = H - p.h;
p.vy *= -bounceFactor;
// Friction applied when on the floor
if(p.vx > 0)
p.vx -= 0.1;
else
p.vx += 0.1;
}
if(p.x + p.w > W) {
p.x = W - p.w;
p.vx *= -bounceFactor;
}
if(p.x < 0) {
p.x = 0;
p.vx *= -0.5;
}
}
}
ctx.globalCompositeOperation = "lighter";
p.draw();
}
}
(function animloop(){
requestAnimFrame(animloop);
update();
})();


|

|

|