Sunday 9 September 2012

Pure CSS3 Cycle Slider For Blogger


Cycle slider is a css based beautiful content/image slide for you to show off some of the best content of your site in some cool animations. You can list up to 5 slides in this slider and it'a automatic slider with some cool animations so it's really going to look amazing on your blog.

As i noted before it's pure css which mean no images and jquery in script which makes it load really fast without any problems.You can also use this slider in your website or wordpress or at any other html document.

Installing :

  • Go To Blogger > Template > Edit HTML > Search for ]]></b:skin> :
  • Just above ]]></b:skin> paste following css :

/* SLIDER */
#slider {
background:#000;
border:5px solid #eaeaea;
box-shadow:1px 1px 5px rgba(0,0,0,0.7);
height:320px;
width:680px;
overflow:visible;
position:relative;
}
#mask {
overflow:hidden;
height:320px;
}
#slider ul {
margin:0;
padding:0;
position:relative;
}
#slider li {
width:680px;
height:320px;
position:absolute;
top:-325px;
list-style:none;
}
#slider li.firstanimation {
-moz-animation:cycle 25s linear infinite;
 -webkit-animation:cycle 25s linear infinite;        }
#slider li.secondanimation {
-moz-animation:cycletwo 25s linear infinite;
-webkit-animation:cycletwo 25s linear infinite; }
#slider li.thirdanimation {
-moz-animation:cyclethree 25s linear infinite;
-webkit-animation:cyclethree 25s linear infinite; }
#slider li.fourthanimation {
-moz-animation:cyclefour 25s linear infinite;
-webkit-animation:cyclefour 25s linear infinite; }
#slider li.fifthanimation {
-moz-animation:cyclefive 25s linear infinite;
-webkit-animation:cyclefive 25s linear infinite; }
#slider .tooltip {
background:rgba(0,0,0,0.7);
width:300px;
height:60px;
position:relative;
bottom:75px;
left:-320px;
-moz-transition:all 0.3s ease-in-out;
-webkit-transition:all 0.3s ease-in-out;
}
#slider .tooltip h1 {
color:#fff;
font-size:24px;
font-weight:300;
        font-family:Comic Sans MS;
line-height:60px;
padding:0 0 0 20px;
}
#slider li#first:hover .tooltip,
#slider li#second:hover .tooltip,
#slider li#third:hover .tooltip,
#slider li#fourth:hover .tooltip,
#slider li#fifth:hover .tooltip {
left:0px;
}
#slider:hover li,
#slider:hover .progress-bar {
-moz-animation-play-state:paused;
-webkit-animation-play-state:paused;
}
/* PROGRESS BAR */
.progress-bar {
position:relative;
top:-5px;
width:680px;
height:5px;
background:#000;
-moz-animation:fullexpand 25s ease-out infinite;
-webkit-animation:fullexpand 25s ease-out infinite;
}
/* ANIMATION */
@-moz-keyframes cycle {
0%  { top:0px; }
4%  { top:0px; }
16% { top:0px; opacity:1; z-index:0; }
20% { top:325px; opacity:0; z-index:0; }
21% { top:-325px; opacity:0; z-index:-1; }
92% { top:-325px; opacity:0; z-index:0; }
96% { top:-325px; opacity:0; }
100%{ top:0px; opacity:1; }
}
@-moz-keyframes cycletwo {
0%  { top:-325px; opacity:0; }
16% { top:-325px; opacity:0; }
20% { top:0px; opacity:1; }
24% { top:0px; opacity:1; }
36% { top:0px; opacity:1; z-index:0; }
40% { top:325px; opacity:0; z-index:0; }
41% { top:-325px; opacity:0; z-index:-1; }
100%{ top:-325px; opacity:0; z-index:-1; }
}
@-moz-keyframes cyclethree {
0%  { top:-325px; opacity:0; }
36% { top:-325px; opacity:0; }
40% { top:0px; opacity:1; }
44% { top:0px; opacity:1; }
56% { top:0px; opacity:1; }
60% { top:325px; opacity:0; z-index:0; }
61% { top:-325px; opacity:0; z-index:-1; }
100%{ top:-325px; opacity:0; z-index:-1; }
}
@-moz-keyframes cyclefour {
0%  { top:-325px; opacity:0; }
56% { top:-325px; opacity:0; }
60% { top:0px; opacity:1; }
64% { top:0px; opacity:1; }
76% { top:0px; opacity:1; z-index:0; }
80% { top:325px; opacity:0; z-index:0; }
81% { top:-325px; opacity:0; z-index:-1; }
100%{ top:-325px; opacity:0; z-index:-1; }
}
@-moz-keyframes cyclefive {
0%  { top:-325px; opacity:0; }
76% { top:-325px; opacity:0; }
80% { top:0px; opacity:1; }
84% { top:0px; opacity:1; }
96% { top:0px; opacity:1; z-index:0; }
100%{ top:325px; opacity:0; z-index:0; }
}
@-webkit-keyframes cycle {
0%  { top:0px; }
4%  { top:0px; }
16% { top:0px; opacity:1; z-index:0; }
20% { top:325px; opacity:0; z-index:0; }
21% { top:-325px; opacity:0; z-index:-1; }
50% { top:-325px; opacity:0; z-index:-1; }
92% { top:-325px; opacity:0; z-index:0; }
96% { top:-325px; opacity:0; }
100%{ top:0px; opacity:1; }
}
@-webkit-keyframes cycletwo {
0%  { top:-325px; opacity:0; }
16% { top:-325px; opacity:0; }
20% { top:0px; opacity:1; }
24% { top:0px; opacity:1; }
36% { top:0px; opacity:1; z-index:0; }
40% { top:325px; opacity:0; z-index:0; }
41% { top:-325px; opacity:0; z-index:-1; }
100%{ top:-325px; opacity:0; z-index:-1; }
}
@-webkit-keyframes cyclethree {
0%  { top:-325px; opacity:0; }
36% { top:-325px; opacity:0; }
40% { top:0px; opacity:1; }
44% { top:0px; opacity:1; }
56% { top:0px; opacity:1; z-index:0; }
60% { top:325px; opacity:0; z-index:0; }
61% { top:-325px; opacity:0; z-index:-1; }
100%{ top:-325px; opacity:0; z-index:-1; }
}
@-webkit-keyframes cyclefour {
0%  { top:-325px; opacity:0; }
56% { top:-325px; opacity:0; }
60% { top:0px; opacity:1; }
64% { top:0px; opacity:1; }
76% { top:0px; opacity:1; z-index:0; }
80% { top:325px; opacity:0; z-index:0; }
81% { top:-325px; opacity:0; z-index:-1; }
100%{ top:-325px; opacity:0; z-index:-1; }
}
@-webkit-keyframes cyclefive {
0%  { top:-325px; opacity:0; }
76% { top:-325px; opacity:0; }
80% { top:0px; opacity:1; }
84% { top:0px; opacity:1; }
96% { top:0px; opacity:1; z-index:0; }
100%{ top:325px; opacity:0; z-index:0; }
}
/* ANIMATION BAR */
@-moz-keyframes fullexpand {
    0%, 20%, 40%, 60%, 80%, 100% { width:0%; opacity:0; }
    4%, 24%, 44%, 64%, 84% { width:0%; opacity:0.3; }
   16%, 36%, 56%, 76%, 96% { width:100%; opacity:0.7; }
   17%, 37%, 57%, 77%, 97% { width:100%; opacity:0.3; }
   18%, 38%, 58%, 78%, 98% { width:100%; opacity:0; } }
@-webkit-keyframes fullexpand {
    0%, 20%, 40%, 60%, 80%, 100% { width:0%; opacity:0; }
    4%, 24%, 44%, 64%, 84% { width:0%; opacity:0.3; }
   16%, 36%, 56%, 76%, 96% { width:100%; opacity:0.7; }
   17%, 37%, 57%, 77%, 97% { width:100%; opacity:0.3; }
   18%, 38%, 58%, 78%, 98% { width:100%; opacity:0; } }

  • Save your template.
  • Now Go To Layout > Add A Gadget > HTML/JavaScript > Paste following code :

<div class="container">
<div id="content-slider">
<div id="slider">
<div id="mask">
<ul>
<li id="first" class="firstanimation">
<a href="#">
<img src="ImgURL" alt="PictureTitle"/>
</a>
<div class="tooltip">
<h1>PictureTitle</h1>
</div>
</li>
<li id="second" class="secondanimation">
<a href="#">
<img src="ImgURL" alt="PictureTitle"/>
</a>
<div class="tooltip">
<h1>PictureTitle</h1>
</div>
</li>
<li id="third" class="thirdanimation">
<a href="#">
<img src="ImgURL" alt="PictureTitle"/>
</a>
<div class="tooltip">
<h1>PictureTitle</h1>
</div>
</li>
<li id="fourth" class="fourthanimation">
<a href="#">
<img src="ImgURL" alt="PictureTitle"/>
</a>
<div class="tooltip">
<h1>PictureTitle</h1>
</div>
</li>
<li id="fifth" class="fifthanimation">
<a href="#">
<img src="ImgURL" alt="PictureTitle"/>
</a>
<div class="tooltip">
<h1>PictureTitle</h1>
</div>
</li>
</ul>
</div>
<div class="progress-bar"></div>
</div>
</div>
</div>

Customization :

  • Replace all # with your desirable address.
  • Replace ImgURL with your image url.
  • Replace  PictureTitle with your image title.

Sticky Bar Widget For Blogger


Sticky bar is used my almost all top blogs even we're using other version of this widget. It helps you to announce new posts or any thing you want your visitors to notice and it comes with a close button so your visitors can easily get rid of it.

Installation :


  • Go To Blogger > Layout > Add A Gadget > HTML/JavaScript > Paste following code :

<!-- This Is A Copyrighted "Widget Craft Top Fixed Bar" Widget, Don't Try To Theft It Otherwise... -->
<style>
#wcbar{
background: -moz-linear-gradient(top, #7d7e7d 0%, #0e0e0e 100%); /* FF3.6+ */
background: -webkit-linear-gradient(top, #7d7e7d 0%,#0e0e0e 100%); /* Webkit Browsers */
background: -o-linear-gradient(top, #7d7e7d 0%,#0e0e0e 100%); /* Opera 11.10+ */
background: -ms-linear-gradient(top, #7d7e7d 0%,#0e0e0e 100%); /* IE10+ */
background: linear-gradient(top, #7d7e7d 0%,#0e0e0e 100%); /* W3C */
filter: progid:DXImageTransform.Microsoft.gradient( startColorstr='#7d7e7d', endColorstr='#0e0e0e',GradientType=0 ); /* IE6-8 */
width:100%;
text-align:center;
top:0px;
left:0px;
border-bottom: 1px solid #888888;
z-index: 999;
height: 28px;
position:fixed;
line-height: 2.2em;
color:#fff;
font-size:13px;
font-weight:bold;
font-family: arial,"Helvetica",sans-serif;
}
#wcbar a{color:#eeff00;text-decoration:none;}
#wcbar a:hover{text-decoration:underline;}
</style>
<script type='text/javascript'>
//<![CDATA[
function closeTopAds() {document.getElementById("wcbar").style.display = "none";}
//]]>
</script>
<div id='wcbar'>
---Your Text Or Links---
<center style='padding:0px; float:right; cursor:pointer;' onclick='closeTopAds();return false;'>X&nbsp;&nbsp;</center>
</div>
<!-- This Is A Copyrighted "Widget Craft Top Fixed Bar" Widget, Don't Try To Theft It Otherwise... -->

  • Now change  ---Your Text Or Links---  with your desire text or links and then save the widget. 

Hope this will help you to gain more attention of your visitors.....

Facebook Like Box Pop Up Widget For Blogger - Version 4.0


Previous Versions : Version 1.0 | Version 2.0 | Version 3.0

Yesterday i found a pic of girl holding a check and i turned it into this widget.It'll surely help you to gain more likes for your facebook page. You can control this widget's appear time so it won't irritate your visitors in every page.

You can generate this widget using our widget generator :

Saturday 8 September 2012

Amazing jQuery Slide Out Navigation For Blogger


I personally love this slide out jquery menu and i think after adding this you'll love it too. It's a good way to display your site's menu if you're using a template which doesn't suit any other menus. It's simple , cool and smooth and i think you should give it a try :

Installation :
  • Go To Blogger > Template > Edit HTML > Search for </head> :
  • Just above  </head>  paste following script :

<script type="text/javascript" src="http://widcraft.googlecode.com/svn/jquery.min.js"></script>
<script type="text/javascript">
$(function() {
var d=300;
$('#navigation a').each(function(){
$(this).stop().animate({
'marginTop':'-80px'
},d+=150);
});
$('#navigation > li').hover(
function () {
$('a',$(this)).stop().animate({
'marginTop':'-2px'
},200);
},
function () {
$('a',$(this)).stop().animate({
'marginTop':'-80px'
},200);
}
);
});
</script>

  • Now search for ]]></b:skin> and just above it paste following CSS : 

ul#navigation {
    position: fixed;
    margin: 0px;
    padding: 0px;
    top: 0px;
    right: 10px;
    list-style: none;
    z-index:999999;
    width:721px;
}
ul#navigation li {
    width: 103px;
    display:inline;
    float:left;  
}
ul#navigation li a {
    display: block;
    float:left;
    margin-top: -2px;
    width: 100px;
    height: 25px;
    background-color:#E7F2F9;
    background-repeat:no-repeat;
    background-position:50% 10px;
    border:1px solid #BDDCEF;
    -moz-border-radius:0px 0px 10px 10px;
    -webkit-border-bottom-right-radius: 10px;
    -webkit-border-bottom-left-radius: 10px;
    -khtml-border-bottom-right-radius: 10px;
    -khtml-border-bottom-left-radius: 10px;
    text-decoration:none;
    text-align:center;
    padding-top:80px;
    opacity: 0.7;
    filter:progid:DXImageTransform.Microsoft.Alpha(opacity=70);
}
ul#navigation li a:hover{
     background-color:#CAE3F2;
}
ul#navigation li a span{
    letter-spacing:2px;
    font-size:11px;
    color:#60ACD8;
    text-shadow: 0 -1px 1px #fff;    
}
ul#navigation .home a{
    background-image: url(https://blogger.googleusercontent.com/img/b/R29vZ2xl/AVvXsEhjuiL5gWfxjmGmgEw9mYdmWyBa-7F7y2C4jcmdFH92JTgM65W2j3jVoOkoYP6IzlRKHwzJ9IUzOklawHqW6WDelygLGx-eoKjLBgXfx2SAsXvED3dxE5C_hbcMOKFZG0CANNKdUGVhnLw/s1600/home.png);
}
ul#navigation .about a      {
    background-image: url(https://blogger.googleusercontent.com/img/b/R29vZ2xl/AVvXsEjZNalF2UT31LXKl4_Cm52rBru5bcYixDAsb2t38YrQpdZbA9axfBPU3MkBNmQpq44hA3VhCQqIkSwN6vT9cQwPbZBUdmNFs4EOThzptToUjz0ad4cF8Z92zM0yhSHlutRMsYhJDH6SLlk/s1600/id_card.png);
}
ul#navigation .search a      {
    background-image: url(https://blogger.googleusercontent.com/img/b/R29vZ2xl/AVvXsEiv_1Nl-RA7wVGmFA4-PHZohMPYuOVA8Sg9Gm_M1mUcaDxAaHB9Gu55qrb57aghtGeBlBkV-dJOW6flmjbwbgQhyphenhyphenXsK-4LpKbfAcJNn34N7CzHnxWtT_vVSaMAuFgbyqOMBFc-eYDYUn9E/s1600/search.png);
}
ul#navigation .podcasts a      {
    background-image: url(https://blogger.googleusercontent.com/img/b/R29vZ2xl/AVvXsEivtP0-H9JFEtyHWmgxt5wYMNyeSjumO1u-Y52rbapHR6uEQYyH6TkhZCp8dwFZ-AljdzU5Q6QOY3TyUg_u6EvxicOul2LDHASlAwZsyO0c0E-ZlZ33PcWdmqt0oBGOKhmRA8aZZxTl7Eo/s1600/news.png);
}
ul#navigation .rssfeed a   {
    background-image: url(https://blogger.googleusercontent.com/img/b/R29vZ2xl/AVvXsEhDF97Mm7IYX5nYoqG1e8iZCoRw6FrsrKt7OFvx1Bk0rzDStdPtPD10Y5-HuDDzno2Yep4qNj5kOe72xI3QPzigFmofl7jz5G6DkFVzzNPO4Sjzh6YiL7z2RoifPyBUsJvnxnZM67Zxx_E/s1600/rss.png);
}
ul#navigation .photos a     {
    background-image: url(https://blogger.googleusercontent.com/img/b/R29vZ2xl/AVvXsEjoo2JwYGPLo2PvvgRk1f4sEdWzt8IDcUGSDsCaGYaZucMjPkkVwzn7df5298kArt2v2krthzenkRUC1HxgAeEodNaLbcSOQstMWWuuKq_GKjja0YY1pxc7oRSgLAR9xAqQLAYfBt4744s/s1600/camera.png);
}
ul#navigation .contact a    {
    background-image: url(https://blogger.googleusercontent.com/img/b/R29vZ2xl/AVvXsEhQKBNF3gSSQts67YHwcmiNkSnNamYNyX99KtC0NmPijTdcd-9y9LiP1R-ztKmtPSN6wl7NhVNg9b2qKG_3lizfvHzr68mAS5_ic63RrJeUykRqrK5b8v1YQ7g2zCR-qo5OeFJz6UFpgOw/s1600/mail.png);
}

  • Save your template
  • Now Go To Blogger > Layout > Add A Gadget > HTML/JavaScript > Paste following code :

<div class="header"></div>
<ul id="navigation">
<li class="home"><a href="#"><span>Home</span></a></li>
<li class="about"><a href="#"><span>About</span></a></li>
<li class="search"><a href="#"><span>Search</span></a></li>
<li class="photos"><a href="#"><span>Photos</span></a></li>
<li class="rssfeed"><a href="#"><span>Rss Feed</span></a></li>
<li class="podcasts"><a href="#"><span>Newsletter</span></a></li>
<li class="contact"><a href="#"><span>Contact</span></a></li>
</ul>

Customization :


  • Replace all # with your links and see it in action.

Stylish CSS3 Menu For Blogger


Another post to show you power of CSS3 . It's a really vintage style menu for blogger and it'll look good in all dark and white blogs specially in header. Just wanna remind you guys again that you can also use this menu in other HTML supported services like Wordpress and all. Here we go :

  • Go To Blogger > Template > Edit HTML > Search for ]]></b:skin> :
  • Just above ]]></b:skin> paste following CSS :

nav ul
{
        padding: 0;
        margin: 0;
        list-style: none;
}
nav li
{
        float: left;
}
nav a
{
    float: left;
    color: #eee;
    margin: 0 5px;
    padding: 3px;
    text-decoration: none;
    border: 1px solid #831608;
    font: bold 14px Arial, Helvetica;
    background-color: #831608;
    background-image: -moz-linear-gradient(#bb413b, #831608);
    background-image: -webkit-gradient(linear, left top, left bottom, from(#bb413b), to(#831608));
    background-image: -webkit-linear-gradient(#bb413b, #831608);
    background-image: -o-linear-gradient(#bb413b, #831608);
    background-image: -ms-linear-gradient(#bb413b, #831608);
    background-image: linear-gradient(#bb413b, #831608);
    -moz-border-radius: 5px;
    -webkit-border-radius: 5px;
    border-radius: 5px;
    text-shadow: 0 -1px 0 rgba(0,0,0,.8);
    -moz-box-shadow: 0 1px 0 rgba(255, 255, 255, 0.3), 0 3px 0 rgba(0, 0, 0, 0.7), 0 2px 2px rgba(0, 0, 0, 0.5), 0 1px 0 rgba(255, 255, 255, 0.5) inset;
    -webkit-box-shadow: 0 1px 0 rgba(255, 255, 255, 0.3), 0 3px 0 rgba(0, 0, 0, 0.7), 0 2px 2px rgba(0, 0, 0, 0.5), 0 1px 0 rgba(255, 255, 255, 0.5) inset;
    box-shadow: 0 1px 0 rgba(255, 255, 255, 0.3), 0 3px 0 rgba(0, 0, 0, 0.7), 0 2px 2px rgba(0, 0, 0, 0.5), 0 1px 0 rgba(255, 255, 255, 0.5) inset;
}
nav a:hover
{
    background-color: #bb413b;
    background-image: -moz-linear-gradient(#831608, #bb413b);
    background-image: -webkit-gradient(linear, left top, left bottom, from(#831608), to(#bb413b));
    background-image: -webkit-linear-gradient(#831608, #bb413b);
    background-image: -o-linear-gradient(#831608, #bb413b);
    background-image: -ms-linear-gradient(#831608, #bb413b);
    background-image: linear-gradient(#831608, #bb413b);
}
nav a:active
{
    background: #bb413b;
    position: relative;
    top: 2px;
    -moz-box-shadow: 0 0 3px rgba(0, 0, 0, 0.7) inset;
    -webkit-box-shadow: 0 0 3px rgba(0, 0, 0, 0.7) inset;
    box-shadow: 0 0 3px rgba(0, 0, 0, 0.7) inset;
}
nav span
{
    border: 1px dashed #eba1a3;
    display: inline-block;
    padding: 4px 15px;
    cursor: pointer;
    background-color: #bb413b;
    background-image: -moz-linear-gradient(#d4463c, #aa2618);
    background-image: -webkit-gradient(linear, left top, left bottom, from(#d4463c), to(#aa2618));
    background-image: -webkit-linear-gradient(#d4463c, #aa2618);
    background-image: -o-linear-gradient(#d4463c, #aa2618);
    background-image: -ms-linear-gradient(#d4463c, #aa2618);
    background-image: linear-gradient(#d4463c, #aa2618);
}
nav a:hover span
{
    background-color: #bb413b;
    background-image: -moz-linear-gradient(#aa2618, #d4463c);
    background-image: -webkit-gradient(linear, left top, left bottom, from(#aa2618), to(#d4463c));
    background-image: -webkit-linear-gradient(#aa2618, #d4463c);
    background-image: -o-linear-gradient(#aa2618, #d4463c);
    background-image: -ms-linear-gradient(#aa2618, #d4463c);
    background-image: linear-gradient(#aa2618, #d4463c);
}

  • Now Go To Layout > Add A Gadget > HTML/JavaScript > Paste following code : 

<nav>
        <ul>
                <li><a href="#"><span>Home</span></a></li>
                <li><a href="#"><span>Categories</span></a></li>
                <li><a href="#"><span>About</span></a></li>
                <li><a href="#"><span>Forum</span></a></li>
                <li><a href="#"><span>Contact</span></a></li>
        </ul>
</nav>

Customization :

  • Now you have to change # with your page links and Home/Categories/About....and all with your custom page title.

Friday 7 September 2012

Converting Your Blogger Template Into Blank Template


Blogger templates are codded using the *XHTML 1.0 Strict Document Type*. It was developed by world wide web consortium on 26 January 2000. Unlike PHP or ASP.net the rules of XML are strict and unforgiving. A slight mistake in code results in terrifying error messages that you often see while editing your blog template.

So here we're going to show you how to convert your blogger template into a blank template for all your HTML related work or any project you're going to do. All credits of this post goes to MBT.

Installing Template :

  • Go To Blogger > Template > Edit HTML > Replace full template code with following code :

<?xml version="1.0" encoding="UTF-8" ?>
<!DOCTYPE html>
<html b:version='2' class='v2' expr:dir='data:blog.languageDirection' xmlns='http://www.w3.org/1999/xhtml' xmlns:b='http://www.google.com/2005/gml/b' xmlns:data='http://www.google.com/2005/gml/data' xmlns:expr='http://www.google.com/2005/gml/expr'>
  <head>
    <meta content='IE=EmulateIE7' http-equiv='X-UA-Compatible'/>
    <b:if cond='data:blog.isMobile'>
      <meta content='width=device-width,initial-scale=1.0,minimum-scale=1.0,maximum-scale=1.0' name='viewport'/>
    <b:else/>
      <meta content='width=1100' name='viewport'/>
    </b:if>
    <b:include data='blog' name='all-head-content'/>
    <title><data:blog.pageTitle/></title>
   <b:skin><![CDATA[/*
-----------------------------------------------
////////////////////////STATIC HTML THEME////////////////////////////////////////////////////////////////////////////////////////
----------------------------------------------- */
#navbar-iframe {   height:0px;   visibility:hidden;   display:none   }
body {
  font: $(body.font);
  color: $(body.text.color);
  background: $(body.background);
  padding: 0 $(content.shadow.spread) $(content.shadow.spread) $(content.shadow.spread);
  $(body.background.override)  margin: 0;
    padding: 0;
}
]]></b:skin>
 
  </head>
  <body>
  <b:section class='navbar' id='navbar' maxwidgets='1' showaddelement='no'>
<b:widget id='Navbar1' locked='true' title='Navbar' type='Navbar'/>
</b:section>
<div style='margin-top:400px; '>
<!--Please keep the Credits intact-->
<center><p><a href='http://www.widcraft.blogspot.com'>Widget Craft </a>&#169; 2012.</p></center>
</div>
  </body>
</html>

  • Click On Save.

  • Click save and when prompted about the following error:

Warning: Your new template does not include the following widgets:
BlogArchive1 Profile1 Attribution1 Header1 Blog1

  • Simply click on Delete widgets and you are all done!

Editing This Template :

  • While creating widgets, you will add the JavaScript just below <head> or above </head>
  • You will add the CSS code inside the two yellow highlighted sections
  • And you will add the widget data or HTML code inside the two green body tags

Adding A Widget :


Now to give you an idea of how easily a blogger template could be designed from scratch simply add the following code just above </body> to make the Post widget function on your Static HTML Theme.

<b:section class='main' id='main' showaddelement='yes'>
<b:widget id='Blog1' locked='true' title='Blog Posts' type='Blog'/>
</b:section>

Save your template and then visit the layout page again. You will be able to see the Post widget and you can now easily edit its formatting options. Go and create a new post and visit your blog to see it working just fine. Congratulations! you have created one of your first blogger widgets. Play this way with some exciting new widgets and find out how creative you could go.

Amazing Slideout Bookmarking Widget For Blogger


Sharing is one of the best ways to promote your content and specially twitter and facebook so all we need is a great sharing tool/widget and here is one which is amazing and really stylish which will surely help you to gain more shares than any other , now just add this widget in your blog by just clicking on Add To Blogger button just below this paragraph :

Get Approved On BuySellAds


BuySellAds is one of the leading publisher companies, which provides really rich quality and easy to load advertisements and you can earn good amount of revenue with it. Only problem with BuySellAds is that it's hard to get approved on it. In this post, I'll will post list of minimum requirements for getting approved.


Minimum Requirements To Getting Approved For BuySellAds :

  • Greater than 100K impressions per month (for new sites, if you (or your team) have a history of creating really nice websites they will accept you)
  • Your website must be live, finished, and have fresh content.
  • Your website must contain custom domain (eg. www.abc.com), they don't accept sub domains (eg. www.abc.blogspot.com)
  • No porn, anything illegal, or containing even remotely "questionable" content.
  • If you have a ton of untargeted ads on your site already, then they are not going to approve you.
  • Getting denied does not mean that they will not approve you at a future date.

Hope this well help you please leave your suggestions and questions in the comment section below.

Creating A jQuery Elastic Menu For Blogger


Second article of day in which i'am going to teach you how to create a jquery elastic menu for blogger and all html docs. Feeling damn sleepy because of not sleeping all night from over 8-9 months and doing blogging and crappy things over the internet all night so i'am going to finish this so quick.

  • Go To Blogger > Template > Edit HTML > Search for ]]></b:skin> :
  • Just above ]]></b:skin> paste following CSS :

/* The container which the menu is "locked" to the bottom of */
#menuwrapper{ position:relative; height:210px; }
/* Fixes the whole menu to the bottom of the parent div */
#menu{position:absolute; bottom:0;}
/* Each individual menu item fixed to the bottom with display:inline-block to create elasticity */
.menuitem{ position:fixed relative; bottom:0px; display:inline-block; }

  • Now search for </head> and just above it paste following script :

<script type="text/javascript" src="http://widcraft.googlecode.com/svn/jquery.min.js"></script>
<script type="text/javascript">
$(document).ready(function(){
 $('.menuitem img').animate({width: 100}, 0); //Set all menu items to smaller size
 $('.menuitem').mouseover(function(){ //When mouse over menu item
  gridimage = $(this).find('img'); //Define target as a variable
  gridimage.stop().animate({width: 200}, 150); //Animate image expanding to original size
 }).mouseout(function(){ //When mouse no longer over menu item
  gridimage.stop().animate({width: 100}, 150); //Animate image back to smaller size
 });
});
</script>

  • Now Go To Layout > Add A Gadget > HTML/JavaScript > Paste following HTML :

<div id="menuwrapper">
 <div id="menu">
  <a href="#" class="menuitem"><img src="Image1"></a><!--Template for each menu item-->
  <a href="#" class="menuitem"><img src="Image2"></a>
  <a href="#" class="menuitem"><img src="Image3"></a>
  <a href="#" class="menuitem"><img src="Image4"></a>
  <a href="#" class="menuitem"><img src="Image5"></a>
 </div>
</div>

Now replace # with you links and Image 1/2/3/4/5 with your image url and just like this you can add as many images as you want....if this widget is not working then check if there is any other CSS in your template with same class and delete it. 

Multicolored CSS3 Tooltips


This is going to be my first post about tooltip and i thought that i should share some cool and easy tooltips for your projects and blogs and finally i found these tooltips. It's CSS3 ( A bit of jquery for IE6 ) So here we go :

First Add JavaScript ( For IE6 ) :

<script type="text/javascript" src="http://widcraft.googlecode.com/svn/jquery.min.js"></script>
<script type="text/javascript">
  $(function() {
    if ($.browser.msie && $.browser.version.substr(0,1)<7)
    {
      $('.tooltip').mouseover(function(){
            $(this).children('span').show();
          }).mouseout(function(){
            $(this).children('span').hide();
          })
    }
  });
</script>

Now Add CSS3 :

<style>
.tooltip
{
  position: relative;
  background: #eaeaea;
  cursor: help;
  display: inline-block;
  text-decoration: none;
  color: #222;
  outline: none;
}
.tooltip span
{
  visibility: hidden;
  position: absolute;
  bottom: 30px;
  left: 50%;
  z-index: 999;
  width: 230px;
  margin-left: -127px;
  padding: 10px;
  border: 2px solid #ccc;
  opacity: .9;
  background-color: #ddd;                  
  background-image: -webkit-linear-gradient(rgba(255,255,255,.5), rgba(255,255,255,0));
  background-image: -moz-linear-gradient(rgba(255,255,255,.5), rgba(255,255,255,0));
  background-image: -ms-linear-gradient(rgba(255,255,255,.5), rgba(255,255,255,0));
  background-image: -o-linear-gradient(rgba(255,255,255,.5), rgba(255,255,255,0));
  background-image: linear-gradient(rgba(255,255,255,.5), rgba(255,255,255,0));
  -moz-border-radius: 4px;
  border-radius: 4px;
  -moz-box-shadow: 0 1px 2px rgba(0,0,0,.4), 0 1px 0 rgba(255,255,255,.5) inset;
  -webkit-box-shadow: 0 1px 2px rgba(0,0,0,.4), 0 1px 0 rgba(255,255,255,.5) inset;
  box-shadow: 0 1px 2px rgba(0,0,0,.4), 0 1px 0 rgba(255,255,255,.5) inset;
  text-shadow: 0 1px 0 rgba(255,255,255,.4);
}
.tooltip:hover
{
  border: 0; /* IE6 fix */
}
.tooltip:hover span
{
  visibility: visible;
}
.tooltip span:before,
.tooltip span:after
{
  content: "";
  position: absolute;
  z-index: 1000;
  bottom: -7px;
  left: 50%;
  margin-left: -8px;
  border-top: 8px solid #ddd;
  border-left: 8px solid transparent;
  border-right: 8px solid transparent;      
  border-bottom: 0;
}
.tooltip span:before
{
  border-top-color: #ccc;
  bottom: -8px;
}
/* Yellow */
.yellow-tooltip span
{
  border-color: #e1ca82;
  background-color: #ffeaa6;                  
}
.yellow-tooltip span:after
{
  border-top-color: #ffeaa6;
}
.yellow-tooltip span:before
{
  border-top-color: #e1ca82;
}
/* Navy */
.navy-tooltip span
{
  color: #fff;
  text-shadow: 0 1px 0 #000;
  border-color: #161a1f;
  background-color: #1e2227;
}
.navy-tooltip span:after
{
  border-top-color: #1e2227;
}
.navy-tooltip span:before
{
  border-top-color: #161a1f;
}
/* Blue */
.blue-tooltip span
{
  border-color: #59add4;
  background-color: #61bde7;
}
.blue-tooltip span:after
{
  border-top-color: #61bde7;
}
.blue-tooltip span:before
{
  border-top-color: #59add4;
}
/* Pink */
.pink-tooltip span
{
  border-color: #ce4378;
  background-color: #ea4c88;
}
.pink-tooltip span:after
{
  border-top-color: #ea4c88;
}
.pink-tooltip span:before
{
  border-top-color: #ce4378;
}
</style>

 Finally HTML Markup :

<a href="#" class="tooltip">Text To Display<span><b>Tooltip Title</b><br>Tooltip Text</span></a>

Now read this carefully there are 5colors of this tooltip and you can change colors by changing class tag below are some examples :

<a href="#" class="tooltip">Gray<span><b>Optional title</b><br>This is a gray CSS3 tooltip.</span></a>

<a href="#" class="tooltip yellow-tooltip">Yellow<span><b>Optional title</b><br>This is a yellow CSS3 tooltip.</span></a>

<a href="#" class="tooltip navy-tooltip">Navy<span><b>Optional title</b><br>This is a navy CSS3 tooltip.</span></a>

<a href="#" class="tooltip blue-tooltip">Blue<span><b>Optional title</b><br>This is a blue CSS3 tooltip.</span></a>

<a href="#" class="tooltip pink-tooltip">Pink<span><b>Optional title</b><br>This is a pink CSS3 tooltip.</span></a>

Thursday 6 September 2012

Sending HTML Emails From Gmail


Gmail is more than just an ordinary email service. It's the most used email service all over internet which provides you lots of services and it's easy to use

Just like other services Rich Text Editor is most advanced mail editor but the fact is that we can't send HTML emails with it but in this post we're going to find a solution of this problem.So the question is how to send HTML emails with Gmail and after doing some research i found that it's not that hard of complicated all you need is HTML knowledge.

For this we just need a WYSIWYG HTML editor just like Blogger provides so you can use Blogger's post editor for this. So now what we have to do is just create our HTML Email in Blogger post editor or any other WYSIWYG HTML editor , you can also use this editor by clicking here.

Now create your full Email in that editor and after creating press CTRL+A to select all content you created on that editor and copy it by pressing CTRL+C and now all we have to do is just go to Gmail and click on Compose Email (In new interfere) and paste all content by pressing CTRL+V and send it to your friends or any one you want.

I know it was easy if you got some basic HTML knowledge.

Fancy Lava Lamp Menu For Blogger


Fancy Lava Lamp menu is one of the most popular and coolest menu i found and it's easy to add them on your blog so without wasting any time let's start :

  • Go To Blogger > Template > Edit HTML > Search for ]]></b:skin> :
  • Just above ]]></b:skin> paste CSS given below :

/*lavalamp fancy menu start*/

.lavalamp {
position: relative;
border: 1px solid #d6d6d6;
background: #fff;
padding: 15px;
-webkit-box-shadow: 0 3px 6px rgba(0,0,0,.25);
-moz-box-shadow: 0 3px 6px rgba(0,0,0,.25);
border-radius : 10px;
-moz-border-radius : 10px;
-webkit-border-radius : 10px;
background : -webkit-gradient(linear, left top, left bottom, from(rgb(240,240,240)), to(rgb(204,204,204)));
background : -moz-gradient(linear, left top, left bottom, from(rgb(240,240,240)), to(rgb(204,204,204)));
height: 18px;
font-family: calibri;
}

.magenta {
background : rgb(190,64,120);
background : -webkit-gradient(linear, left top, left bottom, from(rgb(190,64,120)), to(rgb(177,24,91)));
background : -moz-gradient(linear, left top, left bottom, from(rgb(190,64,120)), to(rgb(177,24,91)));
border: 1px solid #841144;

}

.cyan {
background : rgb(64,181,197);
background : -webkit-gradient(linear, left top, left bottom, from(rgb(64,181,197)), to(rgb(7,165,187)));
background : -moz-gradient(linear, left top, left bottom, from(rgb(64,181,197)), to(rgb(7,165,187)));
border: 1px solid #2f8893;

}

.yellow {
background : rgb(255,199,79);
background : -webkit-gradient(linear, left top, left bottom, from(rgb(255,199,79)), to(rgb(255,188,43)));
background : -moz-gradient(linear, left top, left bottom, from(rgb(255,199,79)), to(rgb(255,188,43)));
border: 1px solid #c08c1f;

}

.orange {
background : rgb(255,133,64);
background : -webkit-gradient(linear, left top, left bottom, from(rgb(255,133,64)), to(rgb(255,107,24)));
background : -moz-gradient(linear, left top, left bottom, from(rgb(255,133,64)), to(rgb(255,107,24)));
border: 1px solid #c04f11;

}

.dark {
background : rgb(89,89,89);
background : -webkit-gradient(linear, left top, left bottom, from(rgb(89,89,89)), to(rgb(54,54,54)));
background : -moz-gradient(linear, left top, left bottom, from(rgb(89,89,89)), to(rgb(54,54,54)));
border: 1px solid #272727;

}

.magenta li a , .cyan li a, .yellow li a , .orange li a, .dark li a{
color: #fff;
text-shadow: 0 -1px 0 rgba(0,0,0,.40);

}

.lavalamp a {
text-decoration: none;
color: #262626;
line-height: 20px;
}

.lavalamp ul {
margin: 0;
padding: 0;
z-index: 300;
position: absolute;
}

.lavalamp ul li {
list-style: none;
float:left;

text-align: center;
}

.lavalamp ul li a {
padding: 0 20px;
text-align: center;
}

.floatr {
position: absolute;
top: 10px;
z-index: 50;
width: 70px;
height: 30px;
border-radius : 8px;
-moz-border-radius : 8px;
-webkit-border-radius : 8px;
background : rgba(0,0,0,.20);
-webkit-transition: all .4s ease-in-out;
-moz-transition: all .4s ease-in-out;
}

/*lavalamp fancy menu End*/

  •  Now search for </head> and just above it paste following script :

<script src='http://widcraft.googlecode.com/svn/jquery.min.js' type='text/javascript'></script>
<script src='http://widcraft.googlecode.com/svn/LavalampMenu.js' type='text/javascript'></script>

  •  Save template 
Installing script and css is done and now we're going to add menu 

  • Go To Blogger > Layout > Add A Gadget > HTML/JavaScript > Paste following code :

<div class="lavalamp">
 <ul>
  <li class="active"><a href="/">Home</a></li>
  <li><a href="#">About</a></li>
  <li><a href="#">Blog</a></li>
  <li><a href="#">Services</a></li>
  <li><a href="#">Portfolio</a></li>
  <li><a href="#">Contacts</a></li>
  <li><a href="#">Back to Article</a></li>
  <li><a href="#">How it Works?</a></li>
 </ul>
 <div class="floatr"></div>
</div>

  • Save and we're done...... 
How To Customize :

Replace all # with your links. As you can see in picture on the top this menu comes with 6 different colors now to change color replace <div class="lavalamp"> with below codes (In order of colors as above pic )

Simple : <div class="lavalamp">

Cyan : <div class="lavalamp cyan">

Dark : <div class="lavalamp dark">

Magenta : <div class="lavalamp magenta">

Orange : <div class="lavalamp orange">

Yellow : <div class="lavalamp yellow">

jsBloggerLightbox For Blogger


jsBloggerLightbox is a specially made for blogger and installing this is very simple and it takes only one step. This lightbox automatically identify all images on your blog and show all of them in this lightbox. First we recommend you to disable default lightbox provided my blogger ( Settings > Post And Comments ). Now it's time to install it :

  • Go To Blogger > Template > Edit HTML > Search for </head>
  • Just above it paste following script :

<script src="http://widcraft.googlecode.com/svn/jquery.js" type="text/javascript">
 </script>
 <script src="http://widcraft.googlecode.com/svn/jsBloggerLightbox.js" type="text/javascript">
 </script>
That's It...Enjoy and share.....

Wednesday 5 September 2012

jQuery Follow Us Social Icons Widget For Blogger


Here is an amazing and sleek jquery widget for your blog to show-off your social links and email. As you can see in above image this widget is very stylish and also a basic widget for every blog.

Generate this widget with our widget generator all you have to do is just put your facebook , twitter usernames and your email address and it's ready to add :

Font Re-Sizer Widget For Blogger


Wondering if your blog's font are big , small or just right ? Just leave it on your visitors because this tool will give your visitors an option yo resize your blog's font as they want.

  • Go To Blogger > Template > Edit HTML > Find </head> 
  • Just above </head> paste following script :

<script src='http://widcraft.googlecode.com/svn/mootools.js' type='text/javascript'/>
  <script type='text/javascript'>
  window.addEvent(&#39;domready&#39;, function(){
var el = $(&#39;myElement&#39;),
  font = $(&#39;fontSize&#39;);
new Slider(el, el.getElement(&#39;.knob&#39;), {
  steps: 35, // Tamaño máximo de la letra
  range: [8], // El 8 es el tamaño mínimo
  onChange: function(value){
  font.setStyle(&#39;font-size&#39;, value);
  }
  }).set(font.getStyle(&#39;font-size&#39;).toInt());
});
  </script>
<style type='text/css'>
  div.slider {
  width: 97%;
  height: 26px;
  background: url(https://blogger.googleusercontent.com/img/b/R29vZ2xl/AVvXsEjN0I_yKmgHnWPUeZQlQvgP9kVgE8LamxXBHTVGEA0mJHXJwMrKLOtRBk1fnogy9y1Ch18VXPUoBF-V0yaWpBdeg_wNxUaldsMvkXRvMrNZN0Md2tUSgXi1_vnypgTro5nhARg6XLkHH8A/s1600/slider-bg.png) no-repeat right top;
  -webkit-border-radius: 5px;
  -moz-border-radius: 5px;
  border-radius: 5px;
  border:1px solid #708B95;
  margin-top:40px;
  }
  div.slider div.knob {
  background: url(https://blogger.googleusercontent.com/img/b/R29vZ2xl/AVvXsEjK3HZtUZFUhfopVT6AayLIAencoItRlumZkD3v9oWsSUJIzPBUSpWvDqvwU74yLuZWldAQz0-zEt4w0-RUNYFdjXF7TadVPS5CTGi0vv631g1aSabkzvG_tfZdGoYLN-nqPW2glQPk3ms/s400/allblogtools-pin.png) no-repeat;
  width: 32px;
  height: 47px;
  margin:-35px 0 0 0;
  cursor: move;
  }
  div#fontSize {
  height: 40px;
  }
  </style>

  • Now search for : 

<b:section class='main' id='main' showaddelement='no'>
<b:widget id='Blog1' locked='true' title='Blog Posts' type='Blog'/>
</b:section>

  • Replace this with :

 <span id='fontSize'>
<b:section class='main' id='main' showaddelement='no'>
<b:widget id='Blog1' locked='true' title='Blog Posts' type='Blog'/>
</b:section>
</span>

  •  Save your template....
  • Now Go To Blogger > Layout > Add A Gadget > HTML/JavaScript > Paste following code :

<div id="myElement" class="slider"><div class="knob"></div><p style="font-size:10px; float:right; margin:3px;">Widget By <a href="http://www.widcraft.blogspot.com/" title="Blogger Widgets" target="_blank">Widget Craft</a> |
<a href="http://widcraft.blogspot.com/2012/09/font-re-sizer-widget-for-blogger.html" title="Font Re-Sizer Widget For Blogger" target="_blank">Get Yours ?</a></p>

  • Click On 'Save'
That's it........Visit your blog and see it in action

Google Style CSS3 Buttons


We all love Google and all of it's content and buttons are one of it.You can use these buttons on your html documents , blogger , wordpress and all html/css supported services , Let's start with CSS :

  • Go To Blogger > Template > Edit HTML > Paste following CSS just above ]]></b:skin> :

.buttons {
    float: left;
    padding-bottom: 20px;
    clear: both;
}
a.button {
    color: #6e6e6e;
    font: bold 12px Helvetica, Arial, sans-serif;
    text-decoration: none;
    padding: 7px 12px;
    position: relative;
    display: inline-block;
    text-shadow: 0 1px 0 #fff;
    -webkit-transition: border-color .218s;
    -moz-transition: border .218s;
    -o-transition: border-color .218s;
    transition: border-color .218s;
    background: #f3f3f3;
    background: -webkit-gradient(linear,0% 40%,0% 70%,from(#F5F5F5),to(#F1F1F1));
    background: -moz-linear-gradient(linear,0% 40%,0% 70%,from(#F5F5F5),to(#F1F1F1));
    border: solid 1px #dcdcdc;
    border-radius: 2px;
    -webkit-border-radius: 2px;
    -moz-border-radius: 2px;
    margin-right: 10px;
}
a.button:hover {
    color: #333;
    border-color: #999;
    -moz-box-shadow: 0 2px 0 rgba(0, 0, 0, 0.2) -webkit-box-shadow:0 2px 5px rgba(0, 0, 0, 0.2);
    box-shadow: 0 1px 2px rgba(0, 0, 0, 0.15);
}
a.button:active {
    color: #000;
    border-color: #444;
}
a.left {
    -webkit-border-top-right-radius: 0;
    -moz-border-radius-topright: 0;
    border-top-right-radius: 0;
    -webkit-border-bottom-right-radius: 0;
    -moz-border-radius-bottomright: 0;
    border-bottom-right-radius: 0;
    margin: 0;
}
a.middle {
    border-radius: 0;
    -webkit-border-radius: 0;
    -moz-border-radius: 0;
    border-left: solid 1px #f3f3f3;
    margin: 0;
    border-left: solid 1px rgba(255, 255, 255, 0);
}
a.middle:hover,
a.right:hover { border-left: solid 1px #999 }
a.right {
    -webkit-border-top-left-radius: 0;
    -moz-border-radius-topleft: 0;
    border-top-left-radius: 0;
    -webkit-border-bottom-left-radius: 0;
    -moz-border-radius-bottomleft: 0;
    border-bottom-left-radius: 0;
    border-left: solid 1px #f3f3f3;
    border-left: solid 1px rgba(255, 255, 255, 0);
}
a.big {
    font-size: 16px;
    padding: 10px 15px;
}
a.supersize {
    font-size: 20px;
    padding: 15px 20px;
}

How To Add :

These buttons are available in two sizes normal and big :

Normal :

<a href="#" class="button">Stand Alone</a>
<a href="#" class="button left">Left</a>
<a href="#" class="button middle">Middle</a>
<a href="#" class="button right">Right</a>
<a href="#" class="button">Stand Alone</a>
Big :

<a href="#" class="button big">Stand Alone</a>
<a href="#" class="button left big">Left</a>
<a href="#" class="button middle big">Middle</a>
<a href="#" class="button right big">Right</a>
<a href="#" class="button big">Stand Alone</a>
That's it.....

Tuesday 4 September 2012

Colored Popular Posts Widget For Blogger


Blogger provides us Popular Posts widget to show off some of the best posts of our blog and we provide you tutorial of making them look great just like above image. In this widget you can display up to 7 widgets and this really looks great in all type of blogs.

Before starting this make sure to backup your template and also make sure that your blogger already has a popular posts widget.

  • Go To Blogger > Template > Edit HTML
  • Search For :

/* Variable definitions
   ====================

  • Just below this post following code :

<Variable name="PopularPosts.background.color1" description="background color1" type="color" default="#fa4242" value="#ff4c54"/>
<Variable name="PopularPosts.background.color2" description="background color2" type="color" default="#ee6107" value="#ff764c"/>
<Variable name="PopularPosts.background.color3" description="background color3" type="color" default="#f0f" value="#ffde4c"/>
<Variable name="PopularPosts.background.color4" description="background color4" type="color" default="#ff0" value="#c7f25f"/>
<Variable name="PopularPosts.background.color5" description="background color5" type="color" default="#0ff" value="#33c9f7"/>
<Variable name="PopularPosts.background.color6" description="background color6" type="color" default="#ff0" value="#7ee3c7"/>
<Variable name="PopularPosts.background.color7" description="background color7" type="color" default="#ff0" value="#f6993d"/>

  • If your template doesn't contain /* Variable definitions tag then just below <b:skin><![CDATA[ paste following code :

/* Variable definitions
   ====================
<Variable name="PopularPosts.background.color1" description="background color1" type="color" default="#fa4242" value="#ff4c54"/>
<Variable name="PopularPosts.background.color2" description="background color2" type="color" default="#ee6107" value="#ff764c"/>
<Variable name="PopularPosts.background.color3" description="background color3" type="color" default="#f0f" value="#ffde4c"/>
<Variable name="PopularPosts.background.color4" description="background color4" type="color" default="#ff0" value="#c7f25f"/>
<Variable name="PopularPosts.background.color5" description="background color5" type="color" default="#0ff" value="#33c9f7"/>
<Variable name="PopularPosts.background.color6" description="background color6" type="color" default="#ff0" value="#7ee3c7"/>
<Variable name="PopularPosts.background.color7" description="background color7" type="color" default="#ff0" value="#f6993d"/>
*/

  •  Now search for ]]></b:skin> :

#PopularPosts1 ul{margin:0;padding:5px 0;list-style-type:none}
#PopularPosts1 ul li{position:relative;margin:5px 0;border:0;padding:10px}
#PopularPosts1 ul li:first-child{background:$(PopularPosts.background.color1);width:90%}
#PopularPosts1 ul li:first-child:after{content:"1"}
#PopularPosts1 ul li:first-child + li{background:$(PopularPosts.background.color2);width:85%}
#PopularPosts1 ul li:first-child + li:after{content:"2"}
#PopularPosts1 ul li:first-child + li + li{background:$(PopularPosts.background.color3);width:80%}
#PopularPosts1 ul li:first-child + li + li:after{content:"3"}
#PopularPosts1 ul li:first-child + li + li + li{background:$(PopularPosts.background.color4);width:75%}
#PopularPosts1 ul li:first-child + li + li + li:after{content:"4"}
#PopularPosts1 ul li:first-child + li + li + li + li{background:$(PopularPosts.background.color5);width:70%}
#PopularPosts1 ul li:first-child + li + li + li + li:after{content:"5"}
#PopularPosts1 ul li:first-child + li + li + li + li +li{background:$(PopularPosts.background.color6);width:65%}
#PopularPosts1 ul li:first-child + li + li + li + li + li:after{content:"6"}
#PopularPosts1 ul li:first-child + li + li + li + li + li +li{background:$(PopularPosts.background.color7);width:60%}
#PopularPosts1 ul li:first-child + li + li + li + li + li + li:after{content:"7"}
#PopularPosts1 ul li:first-child:after,
#PopularPosts1 ul li:first-child + li:after,
#PopularPosts1 ul li:first-child + li + li:after,
#PopularPosts1 ul li:first-child + li + li + li:after,
#PopularPosts1 ul li:first-child + li + li + li + li:after,
#PopularPosts1 ul li:first-child + li + li + li + li + li:after,
#PopularPosts1 ul li:first-child + li + li + li + li + li + li:after{position:absolute;top:20px;right:-15px;border-radius:50%;background:#353535;width:30px;height:30px;line-height:1em;text-align:center;font-size:28px;color:#fff}
#PopularPosts1 ul li .item-thumbnail{float:left;border:0;margin-right:10px;background:transparent;padding:0;width:40px;height:40px}
#PopularPosts1 ul li a{font-size:12px;color:#444;text-decoration:none}
#PopularPosts1 ul li a:hover{color:#222;text-decoration:none}

  •  Now carefully search for :

<b:widget id='PopularPosts1' locked='false' title='Popular Posts' type='PopularPosts'>

  • And replace it with :

<b:widget id='PopularPosts1' locked='false' title='Popular Posts' type='PopularPosts'>
<b:includable id='main'>
   <b:if cond='data:title'>
    <h2><data:title/></h2>
   </b:if>
   <div class='widget-content popular-posts'>
    <ul>
     <b:loop values='data:posts' var='post'>
      <li>
       <b:if cond='data:showThumbnails == &quot;false&quot;'>
        <b:if cond='data:showSnippets == &quot;false&quot;'>
         <a expr:href='data:post.href' expr:title='data:post.title' rel='bookmark'><data:post.title/></a>
        <b:else/>
         <a expr:href='data:post.href' expr:title='data:post.snippet' rel='bookmark'><data:post.title/></a>
        </b:if>
       <b:else/>
        <b:if cond='data:showSnippets == &quot;false&quot;'>
         <b:if cond='data:post.thumbnail'>
          <img class='item-thumbnail' expr:alt='data:post.title' expr:src='data:post.thumbnail'/>
         <b:else/>
          <img alt='no image' class='item-thumbnail' src='https://blogger.googleusercontent.com/img/b/R29vZ2xl/AVvXsEh3UH4DFkEdnHZ1pnH4sc-n0sYyiKYS2Q5qWNuZfUnoM8mCOnyGs57pSs3tlX9RjZpFHJB0edAOBk7UGtvGFs-aVpTPXpKb4JtI-oRWZzfpNPgUjdsSlDq29b8yp_yrI52HvCux3ZLOYdo/s1600/noimage.png'/>
         </b:if>
         <a expr:href='data:post.href' expr:title='data:post.title' rel='bookmark'><data:post.title/></a>
         <div class='clear'/>
        <b:else/>
         <b:if cond='data:post.thumbnail'>
          <img class='item-thumbnail' expr:alt='data:post.title' expr:src='data:post.thumbnail'/>
         <b:else/>
          <img alt='no image' class='item-thumbnail' src='https://blogger.googleusercontent.com/img/b/R29vZ2xl/AVvXsEh3UH4DFkEdnHZ1pnH4sc-n0sYyiKYS2Q5qWNuZfUnoM8mCOnyGs57pSs3tlX9RjZpFHJB0edAOBk7UGtvGFs-aVpTPXpKb4JtI-oRWZzfpNPgUjdsSlDq29b8yp_yrI52HvCux3ZLOYdo/s1600/noimage.png'/>
         </b:if>
         <a expr:href='data:post.href' expr:title='data:post.snippet' rel='bookmark'><data:post.title/></a>
         <div class='clear'/>
        </b:if>
       </b:if>
      </li>
     </b:loop>
    </ul>
   </div>
  </b:includable>
</b:widget>

  • Click on 'Save' and that's IT!!!
Having problems then leave a comment......

Static Facebook Pop Out Like Box Widget For Blogger - Version 2.0


I don't know who originally created this widget but as i like it so much so i thought that i should share this with you. This is version 2.0 so so first you should check out version 1.0.

It's cool jQuery widget which help you to gain more likes and build your fan base.You can generate this widget for your blog with the help of our widget generator :

Monday 3 September 2012

Horizontal Floating Share Bar Widget For Blogger


Here is another cool sharing widget got blogger with a close button so if your visitors don't like this then they can close it by simply clicking on that close button. Let's smooth , cool , user friendly and provided by AddThis.com so it's 100% awesome. So not it's time to show you how to add this in your blog :

  • Go To Blogger > Tempate > Edit HTML > Search For </head>
  • Just above </head> post the script given below :

<script type="text/javascript">
var addthis_config = {
    bar_show_below : 150
}
</script>
<script type="text/javascript" src="http://s7.addthis.com/js/300/addthis_widget.js"></script>
 Now search for </body> and just above it paste following code :

<div class="addthis_bar addthis_bar_medium">
    <label>Share This Page:</label>
    <div class="addthis_toolbox addthis_default_style addthis_32x32_style">
        <span><a class="addthis_button_preferred_1"></a></span>
        <span><a class="addthis_button_preferred_2"></a></span>
        <span><a class="addthis_button_preferred_3"></a></span>
        <span><a class="addthis_button_preferred_4"></a></span>
        <span><a class="addthis_button_compact"></a></span>
        <span><a class="addthis_counter addthis_bubble_style"></a></span>
    </div>
</div>

  • Save your template and we're done :)

 Comment to show your support :)

Shareaholic Sassy Bookmarks Widget For Blogger


No doubt that sharing a key of success for all bloggers and it's important to give our visitors a cool and friendly sharing widget. So instead of cool and friendly here is a sassy and friendly widget for your visitors. Shareaholic is one of the leading bookmarks widget website around the internet and here is an another widget of them for blogger.

On hover this widget will expand and give us some beautiful ways to share our articles with social networking sites like twitter and facebook. Adding this widget is so easy just click on Add To Blogger button below :


Sunday 2 September 2012

Dropdown Labels List Widget For Blogger


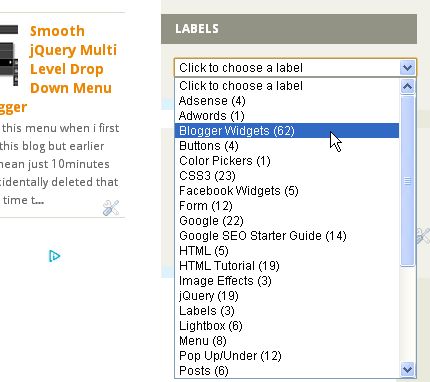
Tagging posts in labels makes navigation so easy for our visitors but soon list becomes big and take over our blog's sidebar and we have to remove other widgets.

Fortunately you can prevent that from happening by converting the widget into a a dropdown (so call Select List) menu.So here we go :

  • Go To Blogger > Template > Edit HTML 
  • Don't mark Expand Widget Templates and search for :
<b:widget id='Label1' locked='false' title='Labels' type='Label'/>

Now replace this code with :

<b:widget id='Label1' locked='false' title='Labels' type='Label'>
<b:includable id='main'>
<b:if cond='data:title'>
<h2><data:title/></h2>
</b:if>
<div class='widget-content'>
<select style='width:100%' onchange='location=this.options[this.selectedIndex].value;'>
<option>Click to choose a label</option>
<b:loop values='data:labels' var='label'>
<option expr:value='data:label.url'><data:label.name/>
(<data:label.count/>)
</option>
</b:loop>
</select>
<b:include name='quickedit'/>
</div>
</b:includable>
</b:widget> 

You can change widget width by changing width:100% . Maybe now you can add more widgets yo your sidebar.

Styling A Select Box Using CSS3

I often use select box in my html documents and i was wondering if i could style them with CSS3 and i searched it on google and found out. So today i'am gonna teach you how to style html select box :

Here is our simple select box/list :


This is the HTML code:

<select>
<option> Everything </option>
<option> Widgets </option>
<option> Tutorial </option>
<option> CSS3 </option>
<option> jQuery </option>
</select>

Very simple , basic and boring. There are certain elements of a select box that we can style such as the font, border, color, padding and background color:


But that annoying drop down arrow always stays the same. There is no direct way to do style it, but the workaround is pretty simple.

First we need to surround our select box element with a div container like this:

<div class="styled-select">
<select>
<option> Everything </option>
<option> Widgets </option>
<option> Tutorial </option>
<option> CSS3 </option>
<option> jQuery </option>
</select>
</div>

Now we'll add some CSS in it :

<style>
.styled-select {
width: 228px;
height: 34px;
overflow: hidden;
background: url(https://blogger.googleusercontent.com/img/b/R29vZ2xl/AVvXsEi_JRz-bgAc-hcLVTK4jrgxxU5Vns_75MO_7pJ27Rcr3H2hHftuOzsxi4jeLTeb6jpZ_ZrY5x98VuwX2rvalWy7GbqrqfK3Ww475TgzfqsE3-qOJDljwGMa6oOxu1NnR2v1QV0O-YkUqQM/s1600/Select.png) no-repeat ;
border-radius: 10px;
}
.styled-select select {
background: transparent;
width: 228px;
padding: 5px;
border: 1px solid #CCC;
font-size: 16px;
height: 34px;
font-weight: bold;
outline:0px;
-webkit-appearance: none;
border-radius: 10px;
}
.styled-select option {
background: lightgrey;
width: 228px;
padding: 5px;
border: 1px solid #CCC;
font-size: 16px;
height: 34px;
outline:0px;
-webkit-appearance: none;
}
</style>

This will look like :


Knowing this little workaround will make it a whole lot easier to style your select box exactly how you want it to be styled using nothing but CSS.

Protect Your Email Address From Spam


There are many reasons why you shouldn't place your email in on a Web Page; the number one being spambots. There are tons a spambots running around the Web looking for that '@' symbol so that they can bombard you with as much spam as possible. Instead of displaying my email address, I use a contact form.Below trick will reduce your chances of getting targeted by spambots.

As you can see in above image, today my spam box got 867 mails (In last 7day) so here is a clever and safe way to display your email address using CSS redirection.

First we have to post this CSS in your HTML document or Blogger template above </head> :

<style type="text/css">
span.redirect {
unicode-bidi:bidi-override;
direction: rtl;
}
</style>

Now we have to write our email address in backwards like this :

<span class="redirect">moc.liamg@emanruoy</span>

It's a simple and useful trick.

Blogger Limits


Just like every website blogger has some user friendly limits.Blogger is one of the best blogging platform after wordpress and it's 100% free but blogger has some user limits (Per Account) which are listed below :

Account limits

  • Number of blogs: 100 per account.
  • Profile Interests and Favorites: 2,000 characters in each field.
  • Number of blogs to follow: 300 blogs per account.
  • Profile "About Me" info length: 1,200 characters.
  • Image uploaded via post editor: 1600px wide. Larger images can be uploaded but it will be scaled down to 1600px wide while preserving the aspect ratio.Image (for background) uploaded via Template Designer > Background page: No limit
  • Image uploaded via post editor: 8MBImage (for background) uploaded via Template Designer > Background page: 300kB.
  • Uploaded via Blogger Mobile: 250KBCapacity of image hosting (on Blogger partner Picasa Web Albums): 1024MB per account.
  • Bandwidth of image hosting: No limit.
Blog Limits

  • Length of blog title: 90 characters.
  • Length of subdomain name (as in http://SUBDOMAIN.blogspot.com): 37 characters.
  • Length of blog description: 500 characters.
  • Number of members: 100 member invitations per blog.
  • Number of readers (for a private blog): 100 per blog.
  • Number of posts: No limit. (However, currently the Edit posts list maxes out at 5000 posts, which could make some older posts inaccessible for editing. Blogger is working on a fix).
  • Number of posts displayed on multiple-post pages (homepage, archive etc.):
  • Blogger will attempt to display the number of posts as set in Settings > Formatting > Show At Most provided the posts’ file size does not exceed the Blogger auto-pagination file size cap of 1MB.
  • Bigger posts may cause fewer number of posts to be displayed.
  • Number of static pages: 10 per blog.
  • Number of labels: 5000 unique labels per blog.
Post Limits

  • Length of individual post: No limit.
  • Size of individual post: No limit, but very large posts may run you up against the multiple-post page size limit (see above).
  • Number of labels: 20 unique labels per post.
  • Number of comments: No limit.
  • Length of post filename: 39 characters (auto-generated from post title, truncated to length).
Other Limits 

  • Label length: 200 characters per label.
  • Comment length: 4,096 characters per comment.
  • 1,000 images per Picasa album.
I hope this will help you in future and if you see any mistake then please comment to let me know. :)

Popular Posts

 
Powered by Blogger.