Thursday 6 September 2012

Fancy Lava Lamp Menu For Blogger


Fancy Lava Lamp menu is one of the most popular and coolest menu i found and it's easy to add them on your blog so without wasting any time let's start :

  • Go To Blogger > Template > Edit HTML > Search for ]]></b:skin> :
  • Just above ]]></b:skin> paste CSS given below :

/*lavalamp fancy menu start*/

.lavalamp {
position: relative;
border: 1px solid #d6d6d6;
background: #fff;
padding: 15px;
-webkit-box-shadow: 0 3px 6px rgba(0,0,0,.25);
-moz-box-shadow: 0 3px 6px rgba(0,0,0,.25);
border-radius : 10px;
-moz-border-radius : 10px;
-webkit-border-radius : 10px;
background : -webkit-gradient(linear, left top, left bottom, from(rgb(240,240,240)), to(rgb(204,204,204)));
background : -moz-gradient(linear, left top, left bottom, from(rgb(240,240,240)), to(rgb(204,204,204)));
height: 18px;
font-family: calibri;
}

.magenta {
background : rgb(190,64,120);
background : -webkit-gradient(linear, left top, left bottom, from(rgb(190,64,120)), to(rgb(177,24,91)));
background : -moz-gradient(linear, left top, left bottom, from(rgb(190,64,120)), to(rgb(177,24,91)));
border: 1px solid #841144;

}

.cyan {
background : rgb(64,181,197);
background : -webkit-gradient(linear, left top, left bottom, from(rgb(64,181,197)), to(rgb(7,165,187)));
background : -moz-gradient(linear, left top, left bottom, from(rgb(64,181,197)), to(rgb(7,165,187)));
border: 1px solid #2f8893;

}

.yellow {
background : rgb(255,199,79);
background : -webkit-gradient(linear, left top, left bottom, from(rgb(255,199,79)), to(rgb(255,188,43)));
background : -moz-gradient(linear, left top, left bottom, from(rgb(255,199,79)), to(rgb(255,188,43)));
border: 1px solid #c08c1f;

}

.orange {
background : rgb(255,133,64);
background : -webkit-gradient(linear, left top, left bottom, from(rgb(255,133,64)), to(rgb(255,107,24)));
background : -moz-gradient(linear, left top, left bottom, from(rgb(255,133,64)), to(rgb(255,107,24)));
border: 1px solid #c04f11;

}

.dark {
background : rgb(89,89,89);
background : -webkit-gradient(linear, left top, left bottom, from(rgb(89,89,89)), to(rgb(54,54,54)));
background : -moz-gradient(linear, left top, left bottom, from(rgb(89,89,89)), to(rgb(54,54,54)));
border: 1px solid #272727;

}

.magenta li a , .cyan li a, .yellow li a , .orange li a, .dark li a{
color: #fff;
text-shadow: 0 -1px 0 rgba(0,0,0,.40);

}

.lavalamp a {
text-decoration: none;
color: #262626;
line-height: 20px;
}

.lavalamp ul {
margin: 0;
padding: 0;
z-index: 300;
position: absolute;
}

.lavalamp ul li {
list-style: none;
float:left;

text-align: center;
}

.lavalamp ul li a {
padding: 0 20px;
text-align: center;
}

.floatr {
position: absolute;
top: 10px;
z-index: 50;
width: 70px;
height: 30px;
border-radius : 8px;
-moz-border-radius : 8px;
-webkit-border-radius : 8px;
background : rgba(0,0,0,.20);
-webkit-transition: all .4s ease-in-out;
-moz-transition: all .4s ease-in-out;
}

/*lavalamp fancy menu End*/

  •  Now search for </head> and just above it paste following script :

<script src='http://widcraft.googlecode.com/svn/jquery.min.js' type='text/javascript'></script>
<script src='http://widcraft.googlecode.com/svn/LavalampMenu.js' type='text/javascript'></script>

  •  Save template 
Installing script and css is done and now we're going to add menu 

  • Go To Blogger > Layout > Add A Gadget > HTML/JavaScript > Paste following code :

<div class="lavalamp">
 <ul>
  <li class="active"><a href="/">Home</a></li>
  <li><a href="#">About</a></li>
  <li><a href="#">Blog</a></li>
  <li><a href="#">Services</a></li>
  <li><a href="#">Portfolio</a></li>
  <li><a href="#">Contacts</a></li>
  <li><a href="#">Back to Article</a></li>
  <li><a href="#">How it Works?</a></li>
 </ul>
 <div class="floatr"></div>
</div>

  • Save and we're done...... 
How To Customize :

Replace all # with your links. As you can see in picture on the top this menu comes with 6 different colors now to change color replace <div class="lavalamp"> with below codes (In order of colors as above pic )

Simple : <div class="lavalamp">

Cyan : <div class="lavalamp cyan">

Dark : <div class="lavalamp dark">

Magenta : <div class="lavalamp magenta">

Orange : <div class="lavalamp orange">

Yellow : <div class="lavalamp yellow">

jsBloggerLightbox For Blogger


jsBloggerLightbox is a specially made for blogger and installing this is very simple and it takes only one step. This lightbox automatically identify all images on your blog and show all of them in this lightbox. First we recommend you to disable default lightbox provided my blogger ( Settings > Post And Comments ). Now it's time to install it :

  • Go To Blogger > Template > Edit HTML > Search for </head>
  • Just above it paste following script :

<script src="http://widcraft.googlecode.com/svn/jquery.js" type="text/javascript">
 </script>
 <script src="http://widcraft.googlecode.com/svn/jsBloggerLightbox.js" type="text/javascript">
 </script>
That's It...Enjoy and share.....

Wednesday 5 September 2012

jQuery Follow Us Social Icons Widget For Blogger


Here is an amazing and sleek jquery widget for your blog to show-off your social links and email. As you can see in above image this widget is very stylish and also a basic widget for every blog.

Generate this widget with our widget generator all you have to do is just put your facebook , twitter usernames and your email address and it's ready to add :

Font Re-Sizer Widget For Blogger


Wondering if your blog's font are big , small or just right ? Just leave it on your visitors because this tool will give your visitors an option yo resize your blog's font as they want.

  • Go To Blogger > Template > Edit HTML > Find </head> 
  • Just above </head> paste following script :

<script src='http://widcraft.googlecode.com/svn/mootools.js' type='text/javascript'/>
  <script type='text/javascript'>
  window.addEvent(&#39;domready&#39;, function(){
var el = $(&#39;myElement&#39;),
  font = $(&#39;fontSize&#39;);
new Slider(el, el.getElement(&#39;.knob&#39;), {
  steps: 35, // Tamaño máximo de la letra
  range: [8], // El 8 es el tamaño mínimo
  onChange: function(value){
  font.setStyle(&#39;font-size&#39;, value);
  }
  }).set(font.getStyle(&#39;font-size&#39;).toInt());
});
  </script>
<style type='text/css'>
  div.slider {
  width: 97%;
  height: 26px;
  background: url(https://blogger.googleusercontent.com/img/b/R29vZ2xl/AVvXsEjN0I_yKmgHnWPUeZQlQvgP9kVgE8LamxXBHTVGEA0mJHXJwMrKLOtRBk1fnogy9y1Ch18VXPUoBF-V0yaWpBdeg_wNxUaldsMvkXRvMrNZN0Md2tUSgXi1_vnypgTro5nhARg6XLkHH8A/s1600/slider-bg.png) no-repeat right top;
  -webkit-border-radius: 5px;
  -moz-border-radius: 5px;
  border-radius: 5px;
  border:1px solid #708B95;
  margin-top:40px;
  }
  div.slider div.knob {
  background: url(https://blogger.googleusercontent.com/img/b/R29vZ2xl/AVvXsEjK3HZtUZFUhfopVT6AayLIAencoItRlumZkD3v9oWsSUJIzPBUSpWvDqvwU74yLuZWldAQz0-zEt4w0-RUNYFdjXF7TadVPS5CTGi0vv631g1aSabkzvG_tfZdGoYLN-nqPW2glQPk3ms/s400/allblogtools-pin.png) no-repeat;
  width: 32px;
  height: 47px;
  margin:-35px 0 0 0;
  cursor: move;
  }
  div#fontSize {
  height: 40px;
  }
  </style>

  • Now search for : 

<b:section class='main' id='main' showaddelement='no'>
<b:widget id='Blog1' locked='true' title='Blog Posts' type='Blog'/>
</b:section>

  • Replace this with :

 <span id='fontSize'>
<b:section class='main' id='main' showaddelement='no'>
<b:widget id='Blog1' locked='true' title='Blog Posts' type='Blog'/>
</b:section>
</span>

  •  Save your template....
  • Now Go To Blogger > Layout > Add A Gadget > HTML/JavaScript > Paste following code :

<div id="myElement" class="slider"><div class="knob"></div><p style="font-size:10px; float:right; margin:3px;">Widget By <a href="http://www.widcraft.blogspot.com/" title="Blogger Widgets" target="_blank">Widget Craft</a> |
<a href="http://widcraft.blogspot.com/2012/09/font-re-sizer-widget-for-blogger.html" title="Font Re-Sizer Widget For Blogger" target="_blank">Get Yours ?</a></p>

  • Click On 'Save'
That's it........Visit your blog and see it in action

Google Style CSS3 Buttons


We all love Google and all of it's content and buttons are one of it.You can use these buttons on your html documents , blogger , wordpress and all html/css supported services , Let's start with CSS :

  • Go To Blogger > Template > Edit HTML > Paste following CSS just above ]]></b:skin> :

.buttons {
    float: left;
    padding-bottom: 20px;
    clear: both;
}
a.button {
    color: #6e6e6e;
    font: bold 12px Helvetica, Arial, sans-serif;
    text-decoration: none;
    padding: 7px 12px;
    position: relative;
    display: inline-block;
    text-shadow: 0 1px 0 #fff;
    -webkit-transition: border-color .218s;
    -moz-transition: border .218s;
    -o-transition: border-color .218s;
    transition: border-color .218s;
    background: #f3f3f3;
    background: -webkit-gradient(linear,0% 40%,0% 70%,from(#F5F5F5),to(#F1F1F1));
    background: -moz-linear-gradient(linear,0% 40%,0% 70%,from(#F5F5F5),to(#F1F1F1));
    border: solid 1px #dcdcdc;
    border-radius: 2px;
    -webkit-border-radius: 2px;
    -moz-border-radius: 2px;
    margin-right: 10px;
}
a.button:hover {
    color: #333;
    border-color: #999;
    -moz-box-shadow: 0 2px 0 rgba(0, 0, 0, 0.2) -webkit-box-shadow:0 2px 5px rgba(0, 0, 0, 0.2);
    box-shadow: 0 1px 2px rgba(0, 0, 0, 0.15);
}
a.button:active {
    color: #000;
    border-color: #444;
}
a.left {
    -webkit-border-top-right-radius: 0;
    -moz-border-radius-topright: 0;
    border-top-right-radius: 0;
    -webkit-border-bottom-right-radius: 0;
    -moz-border-radius-bottomright: 0;
    border-bottom-right-radius: 0;
    margin: 0;
}
a.middle {
    border-radius: 0;
    -webkit-border-radius: 0;
    -moz-border-radius: 0;
    border-left: solid 1px #f3f3f3;
    margin: 0;
    border-left: solid 1px rgba(255, 255, 255, 0);
}
a.middle:hover,
a.right:hover { border-left: solid 1px #999 }
a.right {
    -webkit-border-top-left-radius: 0;
    -moz-border-radius-topleft: 0;
    border-top-left-radius: 0;
    -webkit-border-bottom-left-radius: 0;
    -moz-border-radius-bottomleft: 0;
    border-bottom-left-radius: 0;
    border-left: solid 1px #f3f3f3;
    border-left: solid 1px rgba(255, 255, 255, 0);
}
a.big {
    font-size: 16px;
    padding: 10px 15px;
}
a.supersize {
    font-size: 20px;
    padding: 15px 20px;
}

How To Add :

These buttons are available in two sizes normal and big :

Normal :

<a href="#" class="button">Stand Alone</a>
<a href="#" class="button left">Left</a>
<a href="#" class="button middle">Middle</a>
<a href="#" class="button right">Right</a>
<a href="#" class="button">Stand Alone</a>
Big :

<a href="#" class="button big">Stand Alone</a>
<a href="#" class="button left big">Left</a>
<a href="#" class="button middle big">Middle</a>
<a href="#" class="button right big">Right</a>
<a href="#" class="button big">Stand Alone</a>
That's it.....

Tuesday 4 September 2012

Colored Popular Posts Widget For Blogger


Blogger provides us Popular Posts widget to show off some of the best posts of our blog and we provide you tutorial of making them look great just like above image. In this widget you can display up to 7 widgets and this really looks great in all type of blogs.

Before starting this make sure to backup your template and also make sure that your blogger already has a popular posts widget.

  • Go To Blogger > Template > Edit HTML
  • Search For :

/* Variable definitions
   ====================

  • Just below this post following code :

<Variable name="PopularPosts.background.color1" description="background color1" type="color" default="#fa4242" value="#ff4c54"/>
<Variable name="PopularPosts.background.color2" description="background color2" type="color" default="#ee6107" value="#ff764c"/>
<Variable name="PopularPosts.background.color3" description="background color3" type="color" default="#f0f" value="#ffde4c"/>
<Variable name="PopularPosts.background.color4" description="background color4" type="color" default="#ff0" value="#c7f25f"/>
<Variable name="PopularPosts.background.color5" description="background color5" type="color" default="#0ff" value="#33c9f7"/>
<Variable name="PopularPosts.background.color6" description="background color6" type="color" default="#ff0" value="#7ee3c7"/>
<Variable name="PopularPosts.background.color7" description="background color7" type="color" default="#ff0" value="#f6993d"/>

  • If your template doesn't contain /* Variable definitions tag then just below <b:skin><![CDATA[ paste following code :

/* Variable definitions
   ====================
<Variable name="PopularPosts.background.color1" description="background color1" type="color" default="#fa4242" value="#ff4c54"/>
<Variable name="PopularPosts.background.color2" description="background color2" type="color" default="#ee6107" value="#ff764c"/>
<Variable name="PopularPosts.background.color3" description="background color3" type="color" default="#f0f" value="#ffde4c"/>
<Variable name="PopularPosts.background.color4" description="background color4" type="color" default="#ff0" value="#c7f25f"/>
<Variable name="PopularPosts.background.color5" description="background color5" type="color" default="#0ff" value="#33c9f7"/>
<Variable name="PopularPosts.background.color6" description="background color6" type="color" default="#ff0" value="#7ee3c7"/>
<Variable name="PopularPosts.background.color7" description="background color7" type="color" default="#ff0" value="#f6993d"/>
*/

  •  Now search for ]]></b:skin> :

#PopularPosts1 ul{margin:0;padding:5px 0;list-style-type:none}
#PopularPosts1 ul li{position:relative;margin:5px 0;border:0;padding:10px}
#PopularPosts1 ul li:first-child{background:$(PopularPosts.background.color1);width:90%}
#PopularPosts1 ul li:first-child:after{content:"1"}
#PopularPosts1 ul li:first-child + li{background:$(PopularPosts.background.color2);width:85%}
#PopularPosts1 ul li:first-child + li:after{content:"2"}
#PopularPosts1 ul li:first-child + li + li{background:$(PopularPosts.background.color3);width:80%}
#PopularPosts1 ul li:first-child + li + li:after{content:"3"}
#PopularPosts1 ul li:first-child + li + li + li{background:$(PopularPosts.background.color4);width:75%}
#PopularPosts1 ul li:first-child + li + li + li:after{content:"4"}
#PopularPosts1 ul li:first-child + li + li + li + li{background:$(PopularPosts.background.color5);width:70%}
#PopularPosts1 ul li:first-child + li + li + li + li:after{content:"5"}
#PopularPosts1 ul li:first-child + li + li + li + li +li{background:$(PopularPosts.background.color6);width:65%}
#PopularPosts1 ul li:first-child + li + li + li + li + li:after{content:"6"}
#PopularPosts1 ul li:first-child + li + li + li + li + li +li{background:$(PopularPosts.background.color7);width:60%}
#PopularPosts1 ul li:first-child + li + li + li + li + li + li:after{content:"7"}
#PopularPosts1 ul li:first-child:after,
#PopularPosts1 ul li:first-child + li:after,
#PopularPosts1 ul li:first-child + li + li:after,
#PopularPosts1 ul li:first-child + li + li + li:after,
#PopularPosts1 ul li:first-child + li + li + li + li:after,
#PopularPosts1 ul li:first-child + li + li + li + li + li:after,
#PopularPosts1 ul li:first-child + li + li + li + li + li + li:after{position:absolute;top:20px;right:-15px;border-radius:50%;background:#353535;width:30px;height:30px;line-height:1em;text-align:center;font-size:28px;color:#fff}
#PopularPosts1 ul li .item-thumbnail{float:left;border:0;margin-right:10px;background:transparent;padding:0;width:40px;height:40px}
#PopularPosts1 ul li a{font-size:12px;color:#444;text-decoration:none}
#PopularPosts1 ul li a:hover{color:#222;text-decoration:none}

  •  Now carefully search for :

<b:widget id='PopularPosts1' locked='false' title='Popular Posts' type='PopularPosts'>

  • And replace it with :

<b:widget id='PopularPosts1' locked='false' title='Popular Posts' type='PopularPosts'>
<b:includable id='main'>
   <b:if cond='data:title'>
    <h2><data:title/></h2>
   </b:if>
   <div class='widget-content popular-posts'>
    <ul>
     <b:loop values='data:posts' var='post'>
      <li>
       <b:if cond='data:showThumbnails == &quot;false&quot;'>
        <b:if cond='data:showSnippets == &quot;false&quot;'>
         <a expr:href='data:post.href' expr:title='data:post.title' rel='bookmark'><data:post.title/></a>
        <b:else/>
         <a expr:href='data:post.href' expr:title='data:post.snippet' rel='bookmark'><data:post.title/></a>
        </b:if>
       <b:else/>
        <b:if cond='data:showSnippets == &quot;false&quot;'>
         <b:if cond='data:post.thumbnail'>
          <img class='item-thumbnail' expr:alt='data:post.title' expr:src='data:post.thumbnail'/>
         <b:else/>
          <img alt='no image' class='item-thumbnail' src='https://blogger.googleusercontent.com/img/b/R29vZ2xl/AVvXsEh3UH4DFkEdnHZ1pnH4sc-n0sYyiKYS2Q5qWNuZfUnoM8mCOnyGs57pSs3tlX9RjZpFHJB0edAOBk7UGtvGFs-aVpTPXpKb4JtI-oRWZzfpNPgUjdsSlDq29b8yp_yrI52HvCux3ZLOYdo/s1600/noimage.png'/>
         </b:if>
         <a expr:href='data:post.href' expr:title='data:post.title' rel='bookmark'><data:post.title/></a>
         <div class='clear'/>
        <b:else/>
         <b:if cond='data:post.thumbnail'>
          <img class='item-thumbnail' expr:alt='data:post.title' expr:src='data:post.thumbnail'/>
         <b:else/>
          <img alt='no image' class='item-thumbnail' src='https://blogger.googleusercontent.com/img/b/R29vZ2xl/AVvXsEh3UH4DFkEdnHZ1pnH4sc-n0sYyiKYS2Q5qWNuZfUnoM8mCOnyGs57pSs3tlX9RjZpFHJB0edAOBk7UGtvGFs-aVpTPXpKb4JtI-oRWZzfpNPgUjdsSlDq29b8yp_yrI52HvCux3ZLOYdo/s1600/noimage.png'/>
         </b:if>
         <a expr:href='data:post.href' expr:title='data:post.snippet' rel='bookmark'><data:post.title/></a>
         <div class='clear'/>
        </b:if>
       </b:if>
      </li>
     </b:loop>
    </ul>
   </div>
  </b:includable>
</b:widget>

  • Click on 'Save' and that's IT!!!
Having problems then leave a comment......

Static Facebook Pop Out Like Box Widget For Blogger - Version 2.0


I don't know who originally created this widget but as i like it so much so i thought that i should share this with you. This is version 2.0 so so first you should check out version 1.0.

It's cool jQuery widget which help you to gain more likes and build your fan base.You can generate this widget for your blog with the help of our widget generator :

Monday 3 September 2012

Horizontal Floating Share Bar Widget For Blogger


Here is another cool sharing widget got blogger with a close button so if your visitors don't like this then they can close it by simply clicking on that close button. Let's smooth , cool , user friendly and provided by AddThis.com so it's 100% awesome. So not it's time to show you how to add this in your blog :

  • Go To Blogger > Tempate > Edit HTML > Search For </head>
  • Just above </head> post the script given below :

<script type="text/javascript">
var addthis_config = {
    bar_show_below : 150
}
</script>
<script type="text/javascript" src="http://s7.addthis.com/js/300/addthis_widget.js"></script>
 Now search for </body> and just above it paste following code :

<div class="addthis_bar addthis_bar_medium">
    <label>Share This Page:</label>
    <div class="addthis_toolbox addthis_default_style addthis_32x32_style">
        <span><a class="addthis_button_preferred_1"></a></span>
        <span><a class="addthis_button_preferred_2"></a></span>
        <span><a class="addthis_button_preferred_3"></a></span>
        <span><a class="addthis_button_preferred_4"></a></span>
        <span><a class="addthis_button_compact"></a></span>
        <span><a class="addthis_counter addthis_bubble_style"></a></span>
    </div>
</div>

  • Save your template and we're done :)

 Comment to show your support :)

Shareaholic Sassy Bookmarks Widget For Blogger


No doubt that sharing a key of success for all bloggers and it's important to give our visitors a cool and friendly sharing widget. So instead of cool and friendly here is a sassy and friendly widget for your visitors. Shareaholic is one of the leading bookmarks widget website around the internet and here is an another widget of them for blogger.

On hover this widget will expand and give us some beautiful ways to share our articles with social networking sites like twitter and facebook. Adding this widget is so easy just click on Add To Blogger button below :


Sunday 2 September 2012

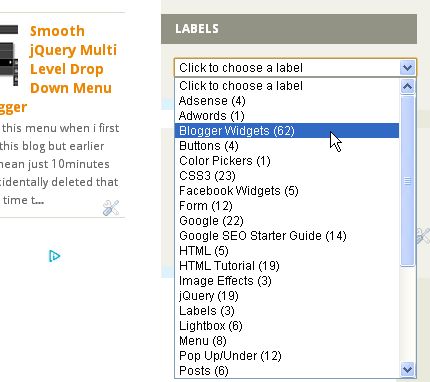
Dropdown Labels List Widget For Blogger


Tagging posts in labels makes navigation so easy for our visitors but soon list becomes big and take over our blog's sidebar and we have to remove other widgets.

Fortunately you can prevent that from happening by converting the widget into a a dropdown (so call Select List) menu.So here we go :

  • Go To Blogger > Template > Edit HTML 
  • Don't mark Expand Widget Templates and search for :
<b:widget id='Label1' locked='false' title='Labels' type='Label'/>

Now replace this code with :

<b:widget id='Label1' locked='false' title='Labels' type='Label'>
<b:includable id='main'>
<b:if cond='data:title'>
<h2><data:title/></h2>
</b:if>
<div class='widget-content'>
<select style='width:100%' onchange='location=this.options[this.selectedIndex].value;'>
<option>Click to choose a label</option>
<b:loop values='data:labels' var='label'>
<option expr:value='data:label.url'><data:label.name/>
(<data:label.count/>)
</option>
</b:loop>
</select>
<b:include name='quickedit'/>
</div>
</b:includable>
</b:widget> 

You can change widget width by changing width:100% . Maybe now you can add more widgets yo your sidebar.

Popular Posts

 
Powered by Blogger.