No doubt that sharing a key of success for all bloggers and it's important to give our visitors a cool and friendly sharing widget. So instead of cool and friendly here is a sassy and friendly widget for your visitors. Shareaholic is one of the leading bookmarks widget website around the internet and here is an another widget of them for blogger.
On hover this widget will expand and give us some beautiful ways to share our articles with social networking sites like twitter and facebook. Adding this widget is so easy just click on Add To Blogger button below :
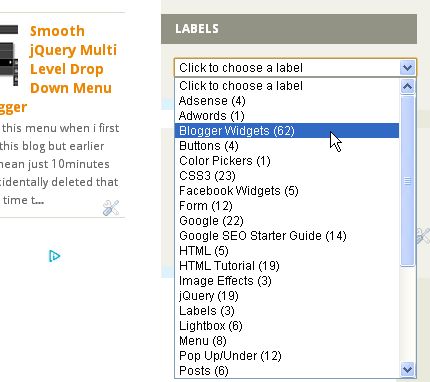
Tagging posts in labels makes navigation so easy for our visitors but soon list becomes big and take over our blog's sidebar and we have to remove other widgets.
Fortunately you can prevent that from happening by converting the widget into a a dropdown (so call Select List) menu.So here we go :
Go To Blogger > Template > Edit HTML
Don't mark Expand Widget Templates and search for :
I often use select box in my html documents and i was wondering if i could style them with CSS3 and i searched it on google and found out. So today i'am gonna teach you how to style html select box :
Very simple , basic and boring. There are certain elements of a select box that we can style such as the font, border, color, padding and background color:
But that annoying drop down arrow always stays the same. There is no direct way to do style it, but the workaround is pretty simple.
First we need to surround our select box element with a div container like this:
There are many reasons why you shouldn't place your email in on a Web Page; the number one being spambots. There are tons a spambots running around the Web looking for that '@' symbol so that they can bombard you with as much spam as possible. Instead of displaying my email address, I use a contact form.Below trick will reduce your chances of getting targeted by spambots.
As you can see in above image, today my spam box got 867 mails (In last 7day) so here is a clever and safe way to display your email address using CSS redirection.
First we have to post this CSS in your HTML document or Blogger template above </head> :
Just like every website blogger has some user friendly limits.Blogger is one of the best blogging platform after wordpress and it's 100% free but blogger has some user limits (Per Account) which are listed below :
Account limits
Number of blogs: 100 per account.
Profile Interests and Favorites: 2,000 characters in each field.
Number of blogs to follow: 300 blogs per account.
Profile "About Me" info length: 1,200 characters.
Image uploaded via post editor: 1600px wide. Larger images can be uploaded but it will be scaled down to 1600px wide while preserving the aspect ratio.Image (for background) uploaded via Template Designer > Background page: No limit
Image uploaded via post editor: 8MBImage (for background) uploaded via Template Designer > Background page: 300kB.
Uploaded via Blogger Mobile: 250KBCapacity of image hosting (on Blogger partner Picasa Web Albums): 1024MB per account.
Bandwidth of image hosting: No limit.
Blog Limits
Length of blog title: 90 characters.
Length of subdomain name (as in http://SUBDOMAIN.blogspot.com): 37 characters.
Length of blog description: 500 characters.
Number of members: 100 member invitations per blog.
Number of readers (for a private blog): 100 per blog.
Number of posts: No limit. (However, currently the Edit posts list maxes out at 5000 posts, which could make some older posts inaccessible for editing. Blogger is working on a fix).
Number of posts displayed on multiple-post pages (homepage, archive etc.):
Blogger will attempt to display the number of posts as set in Settings > Formatting > Show At Most provided the posts’ file size does not exceed the Blogger auto-pagination file size cap of 1MB.
Bigger posts may cause fewer number of posts to be displayed.
Number of static pages: 10 per blog.
Number of labels: 5000 unique labels per blog.
Post Limits
Length of individual post: No limit.
Size of individual post: No limit, but very large posts may run you up against the multiple-post page size limit (see above).
Number of labels: 20 unique labels per post.
Number of comments: No limit.
Length of post filename: 39 characters (auto-generated from post title, truncated to length).
Other Limits
Label length: 200 characters per label.
Comment length: 4,096 characters per comment.
1,000 images per Picasa album.
I hope this will help you in future and if you see any mistake then please comment to let me know. :)
I use tynt tools for my other blogs which add a copyright text and post link into all text visitors copy from my blog and i thought that there would be some trick to do this without using tynt. While searching it on Google i found one post about it on Bavotasan , which i'am going to share with you guys.
It's easy and you can do this in your html documents/blogger/wordpress and every single thing which supports HTML and JavaScript. One more thing that this script doesn't support IE so i suggest you to download Google Chrome.
Below is the script
<script type="text/javascript">
function addLink() { var body_element = document.getElementsByTagName('body')[0]; var selection; selection = window.getSelection(); var pagelink = "<br /><br /> Read more at: <a href='"+document.location.href+"'>"+document.location.href+"</a><br />Copyright © Widget Craft"; // change this if you want var copytext = selection + pagelink; var newdiv = document.createElement('div'); newdiv.style.position='absolute'; newdiv.style.left='-99999px'; body_element.appendChild(newdiv); newdiv.innerHTML = copytext; selection.selectAllChildren(newdiv); window.setTimeout(function() { body_element.removeChild(newdiv); },0);
}
document.oncopy = addLink;
</script>
That's.....If you're copying content from any site please respect their copyrights.
Here is an another article on CSS3 power which is amazing as always.There are two qualities of this , first that it's cool and second that if you're a 8-bit fan than go to Internet Explorer and it'll look something like this :
And all i wanna say this that go and please download Google Chrome if you wanna see every CSS3 element beautiful as that. So here we go :
Every blogger wants a good newsletter template for their newsletter just like me and with help of Google Docs even peoples who are using Blogger as their blogging platform can also create their own newsletter.
All newsletter are image-based forms which are created on a image with HTML and CSS and looks really amazing.
Original creator and form source CSS Globe and all credits goes to them i'am just sharing with you guys , visit their website for more awesome stuff including this forms. So these forms looks truly beautiful and professional ( Thanks to CSS Globe ) so here we go with CSS:
Creating your own Lightbox is not that hard maybe it'll not be that advanced my it could be like above image and today in this article i'am gonna teach you about it. Full tutorial is jQuery and CSS3 based and creating a simple lightbox is not that hard.
In above CSS #Lightbox is our lightbox background , #Lightbox-panel is our lightbox and #Close-panel is our lightbox close button.
Z-index of #lightbox-panel should be more than #lightbox otherwise your lightbox will appear under background.Now time to add JavaScript which will give you control to open or close lightbox :
In javascript there are the snippets first one opens the lightbox , second one closes it when you on close button and third button closes it when you click outside/background of lightbox and we're almost done with this just have to add HTML now :
So <a id="show-panel" href="#">Show Panel</a> is button which will open the lightbox and <div id="lightbox-panel">...All Crap.. </div> is our lightbox and we have to add our content in it , <a id="close-panel".........</a> is our close button and in last <div id="lightbox"> </div> is our lightbox background.