Showing posts with label Labels. Show all posts

Saturday 30 March 2013

Blogger Label Specify Feeds


Past June, I shared a tutorial about showing recent posts from a label, which was a helpful post. Earlier today, I was thinking if we could subscribe to specific label from our blog to get what we really want, and I read that article again and found a way to do this.

We don't need any other service, code or script to do this. It's just to easy and common thing. Also, email subscriptions of these feeds is not possible. It's a great idea to five your reader's an option to subscribe to their favorite content.

Now time to begin this tutorial. So, first below is our magic code :p

http://yourblog.blogspot.com/feeds/posts/default/-/LABEL

  • First, in above code replace yourblog with your blog's url.
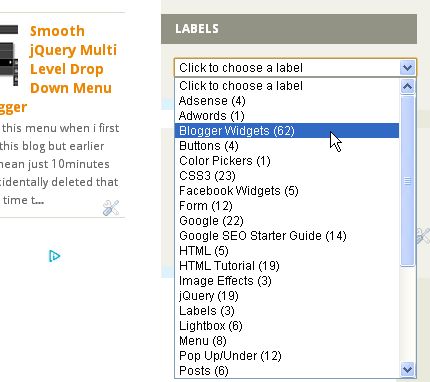
  • Now replace LABEL with the name of the label you want. If your label is made up of more than one word it can get confusing as the space between the words will be filled automatically as shown below :

http://yourblog.blogspot.com/feeds/posts/default/-/Blogger%20Widgets

That's easy! Now subscribe to it with your favorite reader. It's sad that Google Reader is shutting down.

Rest In Peace ~ Reid Flair (February 26, 1988 – March 29, 2013) ~ Son of the legendary Ric Flair ~ We lost a young talent.

Thursday 7 February 2013

Customized Labels Cloud Widget For Blogger


Here is a great Labels Cloud styling/widget invented my MBT. It looks a bit old-school but it's looks so beautiful in plain or white style templates. MBT widgets never gets old for sure. It for Labels Cloud widget so don't forget to choose Labels Cloud option in Layout section. Don't worry, i'll explain everything:

  • Go To Blogger > Layout > Click add a gadget and choose Labels
  • Inside the settings make sure to choose the cloud display.
  • Now save the widget and go to settings > Template
  • Click Edit HTML > Search for ]]></b:skin>
  • Just above it paste the following CSS code:

/*-----Custom Labels Cloud widget by www.BWidgets.com----*/
.label-size{
margin:0 2px 6px 0;
padding: 3px;
text-transform: uppercase;
border: solid 1px #C6C6C6;
border-radius: 3px;
float:left;
text-decoration:none;
font-size:10px;
color:#666;
}

.label-size:hover {
border:1px solid #6BB5FF;
text-decoration: none;
-moz-transition: all 0.5s ease-out;
-o-transition: all 0.5s ease-out;
-webkit-transition: all 0.5s ease-out;
-ms-transition: all 0.5s ease-out;
transition: all 0.5s ease-out;
-moz-transform: rotate(7deg);
-o-transform: rotate(7deg);
-webkit-transform: rotate(7deg);
-ms-transform: rotate(7deg);
transform: rotate(7deg);
filter: progid:DXImageTransform.Microsoft.Matrix(
                    M11=0.9961946980917455, M12=-0.08715574274765817, M21=0.08715574274765817, M22=0.9961946980917455, sizingMethod='auto expand');
zoom: 1;
}

.label-size a  {
text-transform: uppercase;
float:left;
text-decoration: none;
}
.label-size a:hover  {
text-decoration: none;
}

Save your template....All Done......Don't forget to leave a comment for any help.....

Tuesday 2 October 2012

Display Post Author, Date, Labels And Comments With Icons Below Post Titles


Today i'am sharing a great post by Helper Blogger. Here is a great widget to show author name , time , label and a comment bar with icons just below your blogger post titles. When there are no comments posted,the comment link says 'Be the First to comment!' and when there is just one comment it says '1 comment so far'. Here we go :

Installing :

  • Go To Blogger > Template > Edit HTML > Tick expand widget templates check box.
  • Now search for <div class='post-header-line-1'> and just above it paste following code :

<font style='background:transparent url(https://blogger.googleusercontent.com/img/b/R29vZ2xl/AVvXsEjavzoRG9bfyrjlRqJ-YEyq_E9VrXArh02J5-_Kb8Ks3jSRVE-e9Eg_gwUG0PjAP54kLQ9z8mJqF1zwkHX4gaMCp5yEChjTt1G5nCyNnyH-ry-san5I1-AeeqmH_YfL7S_aSBVoNG39D-U/s1600/author.gif) no-repeat scroll top left;padding-left:25px;font-size:11px;'><data:post.author/></font> | <font style='background:transparent url(https://blogger.googleusercontent.com/img/b/R29vZ2xl/AVvXsEgnuBIJuJnKzy9R9IkTwPmSS4X0_5txI0Xsy9Ixk-Cwq6A5dQjXeylNir6xumH1L62aEpYl-cazDM0naaRoLofzdm1XygHP0OOg8jFYTieaUx5XbWBiZ9LH98h-ozsqTPoGg8ZVuJR2j4U/s1600/clock-icon.gif) no-repeat scroll top left;padding-left:25px;font-size:11px;'><data:post.timestamp/></font> | <font style='background:transparent url(https://blogger.googleusercontent.com/img/b/R29vZ2xl/AVvXsEhDhdzvktxmxLTbsOUvVsExq9HzYnFON7p8OzGwvD4WaUqmdNhdyItxsiG5zEgiijnWRCpbnqZY7Vturb4Xl96iA9N3QqwzAuazWu9JBHdBALwx90YFXrbwb-VoPgk1XNHzrXTVokmZ_hU/s1600/tag+icon.gif) no-repeat scroll top left;padding-left:25px;font-size:11px;'><b:if cond='data:post.labels'>
<b:loop values='data:post.labels' var='label'>
<a expr:href='data:label.url + &quot;?max-results=8&quot;' rel='tag'><data:label.name/></a>
<b:if cond='data:label.isLast != &quot;true&quot;'>|</b:if>
</b:loop>
</b:if></font>
<span class='post-comment-link' style='Float:right;'>
        <b:if cond='data:blog.pageType != &quot;item&quot;'>
          <b:if cond='data:post.allowComments'>
            <a class='comment-link' expr:href='data:post.addCommentUrl' expr:onclick='data:post.addCommentOnclick' style='background:url(https://blogger.googleusercontent.com/img/b/R29vZ2xl/AVvXsEh-SZ6VJVZxY0nuGkWd1ezF5fF9s38C9wobjd8TBJMezWUjJ74Hr1WdOhhSzQRjYKJADrevDms8u42BUWEoo0ZB8DJ1XnJko5x69CYXdkpX3l85vo57wCEzjw2dCuxq7nO5vx7nYNvUQdo/s1600/comment-icon.png) no-repeat;Padding-left:20px;'><b:if cond='data:post.numComments == 0'>Be the first to comment!<b:else/> <b:if cond='data:post.numComments == 1'><data:post.numComments/> Comment so far<b:else/><data:post.numComments/> Comments so far</b:if> </b:if></a>
          </b:if>
        </b:if>
      </span>

Customizing :

  •  You can change all icons of this widget and also text to display then there is one or zero comments.

Sunday 2 September 2012

Dropdown Labels List Widget For Blogger


Tagging posts in labels makes navigation so easy for our visitors but soon list becomes big and take over our blog's sidebar and we have to remove other widgets.

Fortunately you can prevent that from happening by converting the widget into a a dropdown (so call Select List) menu.So here we go :

  • Go To Blogger > Template > Edit HTML 
  • Don't mark Expand Widget Templates and search for :
<b:widget id='Label1' locked='false' title='Labels' type='Label'/>

Now replace this code with :

<b:widget id='Label1' locked='false' title='Labels' type='Label'>
<b:includable id='main'>
<b:if cond='data:title'>
<h2><data:title/></h2>
</b:if>
<div class='widget-content'>
<select style='width:100%' onchange='location=this.options[this.selectedIndex].value;'>
<option>Click to choose a label</option>
<b:loop values='data:labels' var='label'>
<option expr:value='data:label.url'><data:label.name/>
(<data:label.count/>)
</option>
</b:loop>
</select>
<b:include name='quickedit'/>
</div>
</b:includable>
</b:widget> 

You can change widget width by changing width:100% . Maybe now you can add more widgets yo your sidebar.

Sunday 8 July 2012

Label Widget Style For Blogger


Here we go :
  • First add a Label widget on your blog.
  • Change setting to cloud style.
  • Add this widget on your blog :


Friday 6 July 2012

Animated Label Cloud Widget For Blogger

This is the most amazing way to show your blog's labels. This widget is originally for wordpress but now you can add this on your blogger. Generate this widget with the help of our Widget Generator :

Saturday 9 June 2012

Show Recent Posts From A Label On Blogger


It's easy to show latest posts from a label of your blog..... just follow these easy steps :D
  • In your Blogger Dashboard click > Design > Edit Html 
  • Find the ]]></b:skin> code in your blogs Html : (Click Ctrl and F for a search bar to help find the code
  • Copy and paste the following code Directly Above / Before ]]></b:skin>
/*** Recent Labels Gadget Css ***/
img.label_thumb{
float:left;
padding:5px;
border:1px solid #8f8f8f;
background:#D2D0D0;
margin-right:10px;
height:55px;
width:55px;
}
img.label_thumb:hover{
background:#f7f6f6;
}
.label_with_thumbs {
float: left;
width: 100%;
min-height: 70px;
margin: 0px 10px 2px 0px;
adding: 0;
}
ul.label_with_thumbs li {
padding:8px 0;
min-height:65px;
margin-bottom:10px;
}
.label_with_thumbs a {}
.label_with_thumbs strong {}
  • Find the </head> code in your blogs Html : (Click Ctrl and F for a search bar to help find the code
  • Copy and paste the following code Directly Above / Before </head>

<script type='text/javascript'>
//<![CDATA[
function labelthumbs(json){document.write('<ul class="label_with_thumbs">');for(var i=0;i<numposts;i++){var entry=json.feed.entry[i];var posttitle=entry.title.$t;var posturl;if(i==json.feed.entry.length)break;for(var k=0;k<entry.link.length;k++){if(entry.link[k].rel=='replies'&&entry.link[k].type=='text/html'){var commenttext=entry.link[k].title;var commenturl=entry.link[k].href;}
if(entry.link[k].rel=='alternate'){posturl=entry.link[k].href;break;}}var thumburl;try{thumburl=entry.media$thumbnail.url;}catch(error)
{s=entry.content.$t;a=s.indexOf("<img");b=s.indexOf("src=\"",a);c=s.indexOf("\"",b+5);d=s.substr(b+5,c-b-5);if((a!=-1)&&(b!=-1)&&(c!=-1)&&(d!="")){thumburl=d;}else thumburl='https://blogger.googleusercontent.com/img/b/R29vZ2xl/AVvXsEidhPxUFZ-CQvsvlHMg_JXUtd7Hw-cEeSd5irVvVaXeQpa-iK0TCOUAxML4OB9O-Ktd8QhvK5rMG8e9inY6o4yRAiYzaoANpL_mIf2tGIAjK2xFtSuNXeA3zB5OnusuW8r-NNJY29rVJoqn/';}
var postdate=entry.published.$t;var cdyear=postdate.substring(0,4);var cdmonth=postdate.substring(5,7);var cdday=postdate.substring(8,10);var monthnames=new Array();monthnames[1]="Jan";monthnames[2]="Feb";monthnames[3]="Mar";monthnames[4]="Apr";monthnames[5]="May";monthnames[6]="Jun";monthnames[7]="Jul";monthnames[8]="Aug";monthnames[9]="Sep";monthnames[10]="Oct";monthnames[11]="Nov";monthnames[12]="Dec";document.write('<li class="clearfix">');if(showpostthumbnails==true)
document.write('<a href="'+posturl+'" target ="_top"><img class="label_thumb" src="'+thumburl+'"/></a>');document.write('<strong><a href="'+posturl+'" target ="_top">'+posttitle+'</a></strong><br>');if("content"in entry){var postcontent=entry.content.$t;}
else
if("summary"in entry){var postcontent=entry.summary.$t;}
else var postcontent="";var re=/<\S[^>]*>/g;postcontent=postcontent.replace(re,"");if(showpostsummary==true){if(postcontent.length<numchars){document.write('');document.write(postcontent);document.write('');}
else{document.write('');postcontent=postcontent.substring(0,numchars);var quoteEnd=postcontent.lastIndexOf(" ");postcontent=postcontent.substring(0,quoteEnd);document.write(postcontent+'...');document.write('');}}
var towrite='';var flag=0;document.write('<br>');if(showpostdate==true){towrite=towrite+monthnames[parseInt(cdmonth,10)]+'-'+cdday+' - '+cdyear;flag=1;}
if(showcommentnum==true)
{if(flag==1){towrite=towrite+' | ';}
if(commenttext=='1 Comments')commenttext='1 Comment';if(commenttext=='0 Comments')commenttext='No Comments';commenttext='<a href="'+commenturl+'" target ="_top">'+commenttext+'</a>';towrite=towrite+commenttext;flag=1;;}
if(displaymore==true)
{if(flag==1)towrite=towrite+' | ';towrite=towrite+'<a href="'+posturl+'" class="url" target ="_top">More »</a>';flag=1;;}
document.write(towrite);document.write('</li>');if(displayseparator==true)
if(i!=(numposts-1))
document.write('');}document.write('</ul>');}
//]]>
</script>
  • Now save your template 
  • Go to Layout > Add A Gadget > HTML /Java Script and post the following code
<script type='text/javascript'>var numposts = 3;var showpostthumbnails = true;var displaymore = false;var displayseparator = false;var showcommentnum = false;var showpostdate = false;var showpostsummary = true;var numchars = 80;</script>
<script type="text/javascript" src="/feeds/posts/default/-/LABEL?orderby=updated&alt=json-in-script&callback=labelthumbs"></script>

You must add the name of the label you want to to the above code.Replace LABEL in red with the label name.

Example - If i wanted to display posts from the gadgets label i would replace LABEL with Widgets.
(http://www.widcraft.blogspot.com/search/label/ Widgets /)

If your label is made up of more than one word it can get confusing as the space between the words will be filled automatically as shown below :

http://www.widcraft.blogspot.com/search/label/Blogger%20Widgets 

If you are going to use a label with more than one word make sure to first see how the label appears.

  • Save the gadget and you can drag and drop it into the position you want it displayed on your blog.

Popular Posts

 
Powered by Blogger.